How to Measure Corner Windows
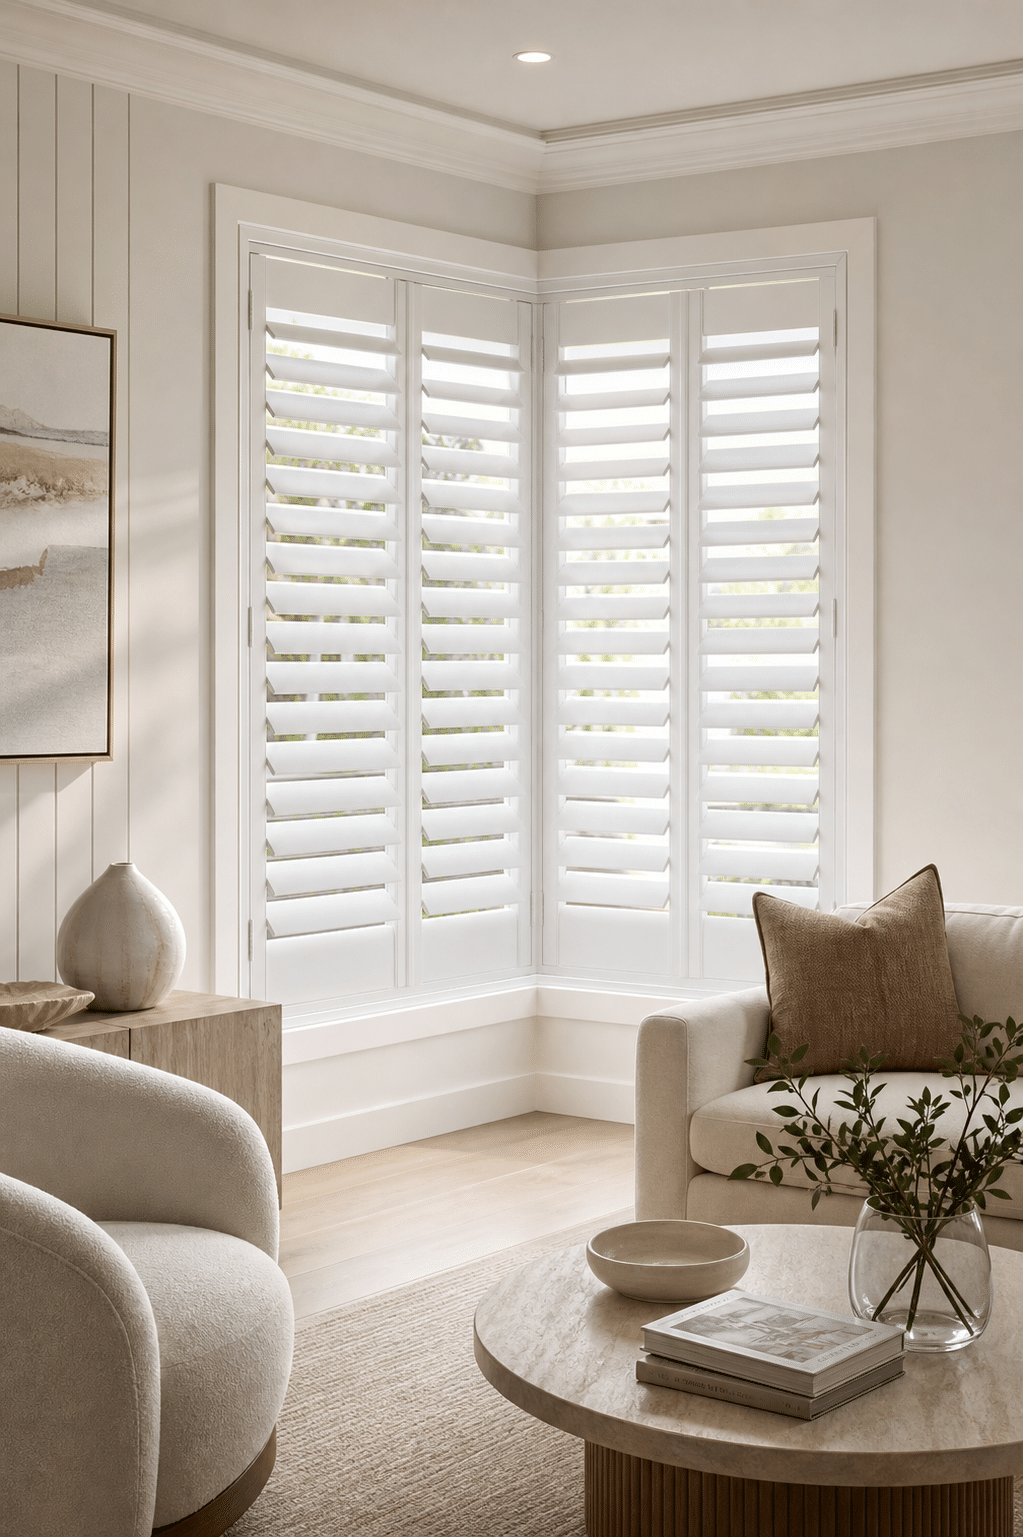
Corner windows need additional planning because shutters on two adjoining walls meet at an angle and their frames or panels can interfere with one another.
What Is a Corner Window?
A corner window is formed where two window openings meet at the corner of a room. The two faces need to be planned together because the shutter frames and panels meet at the same corner.
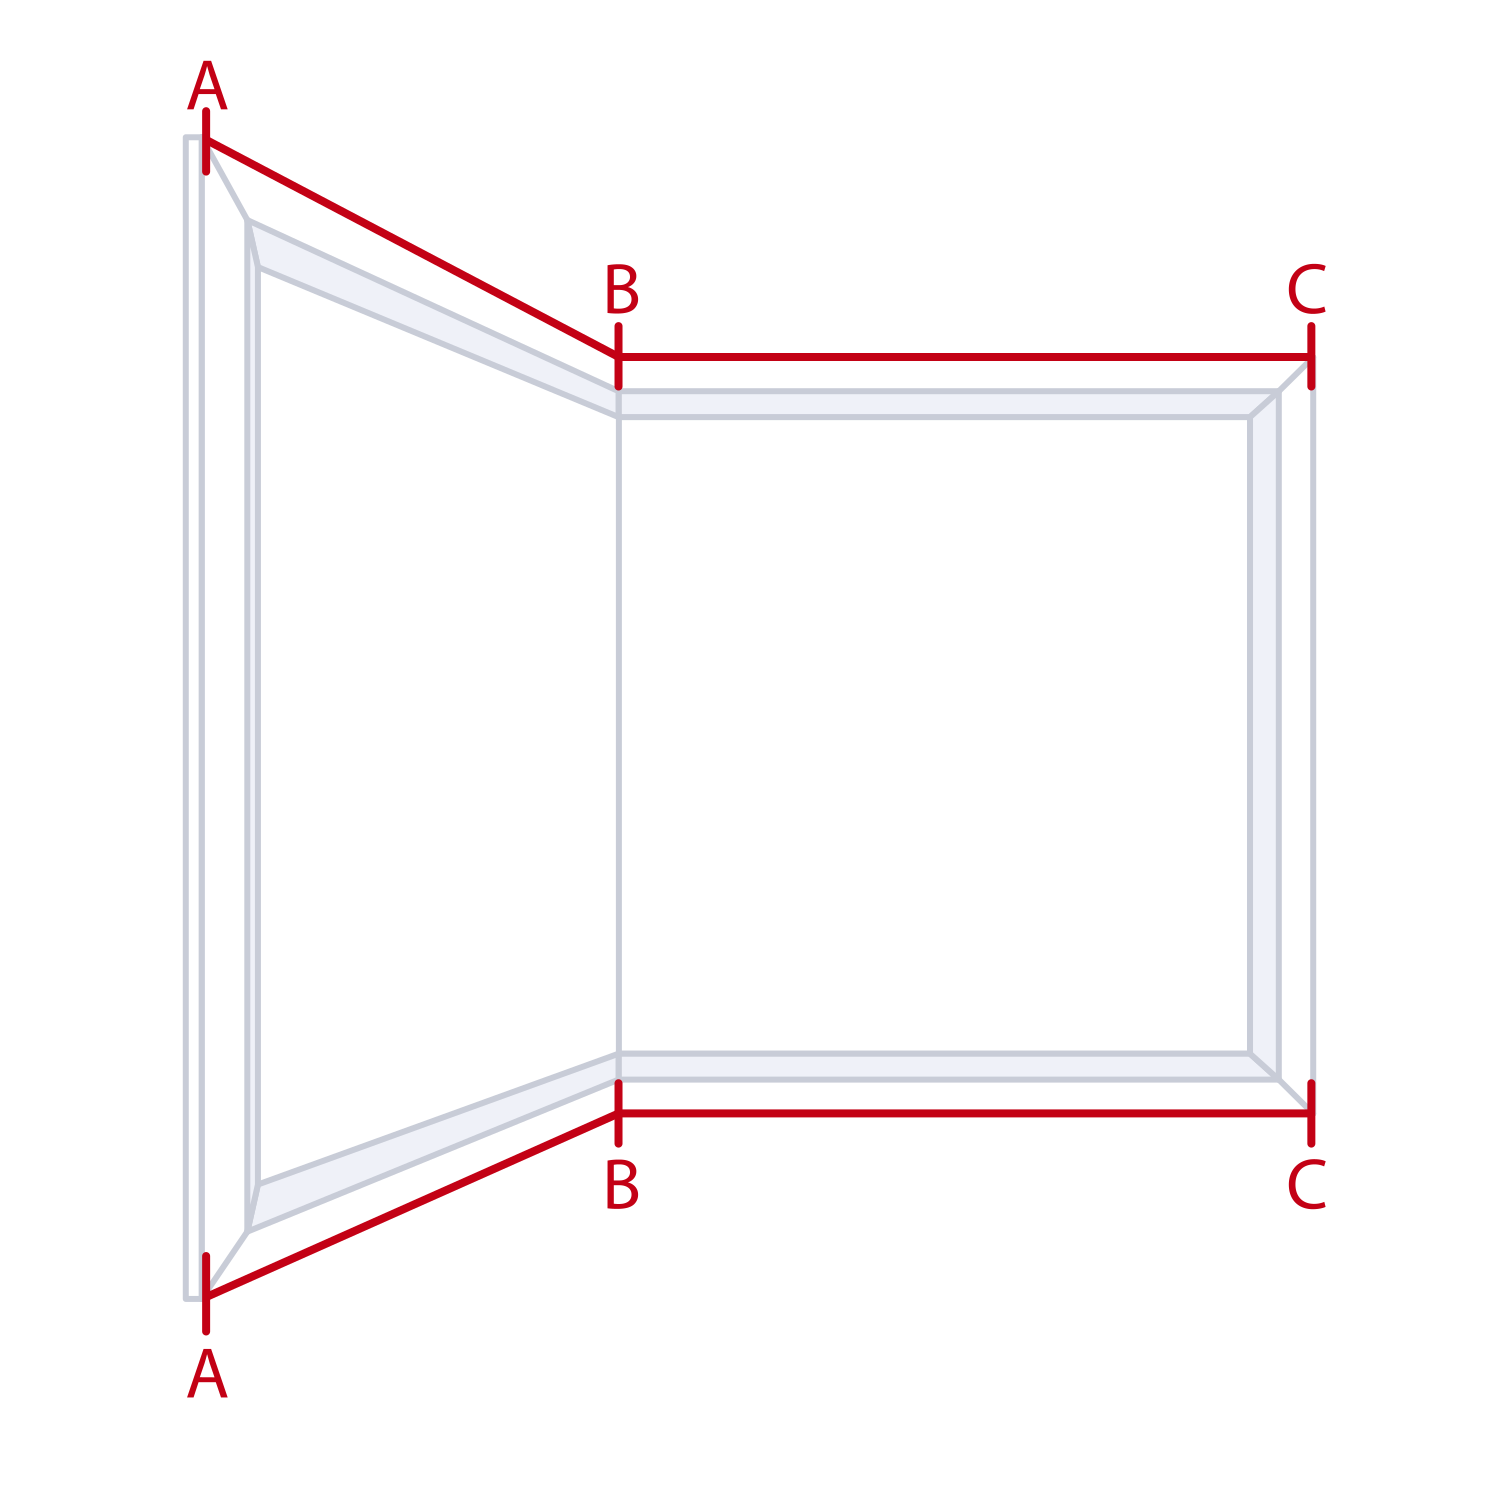
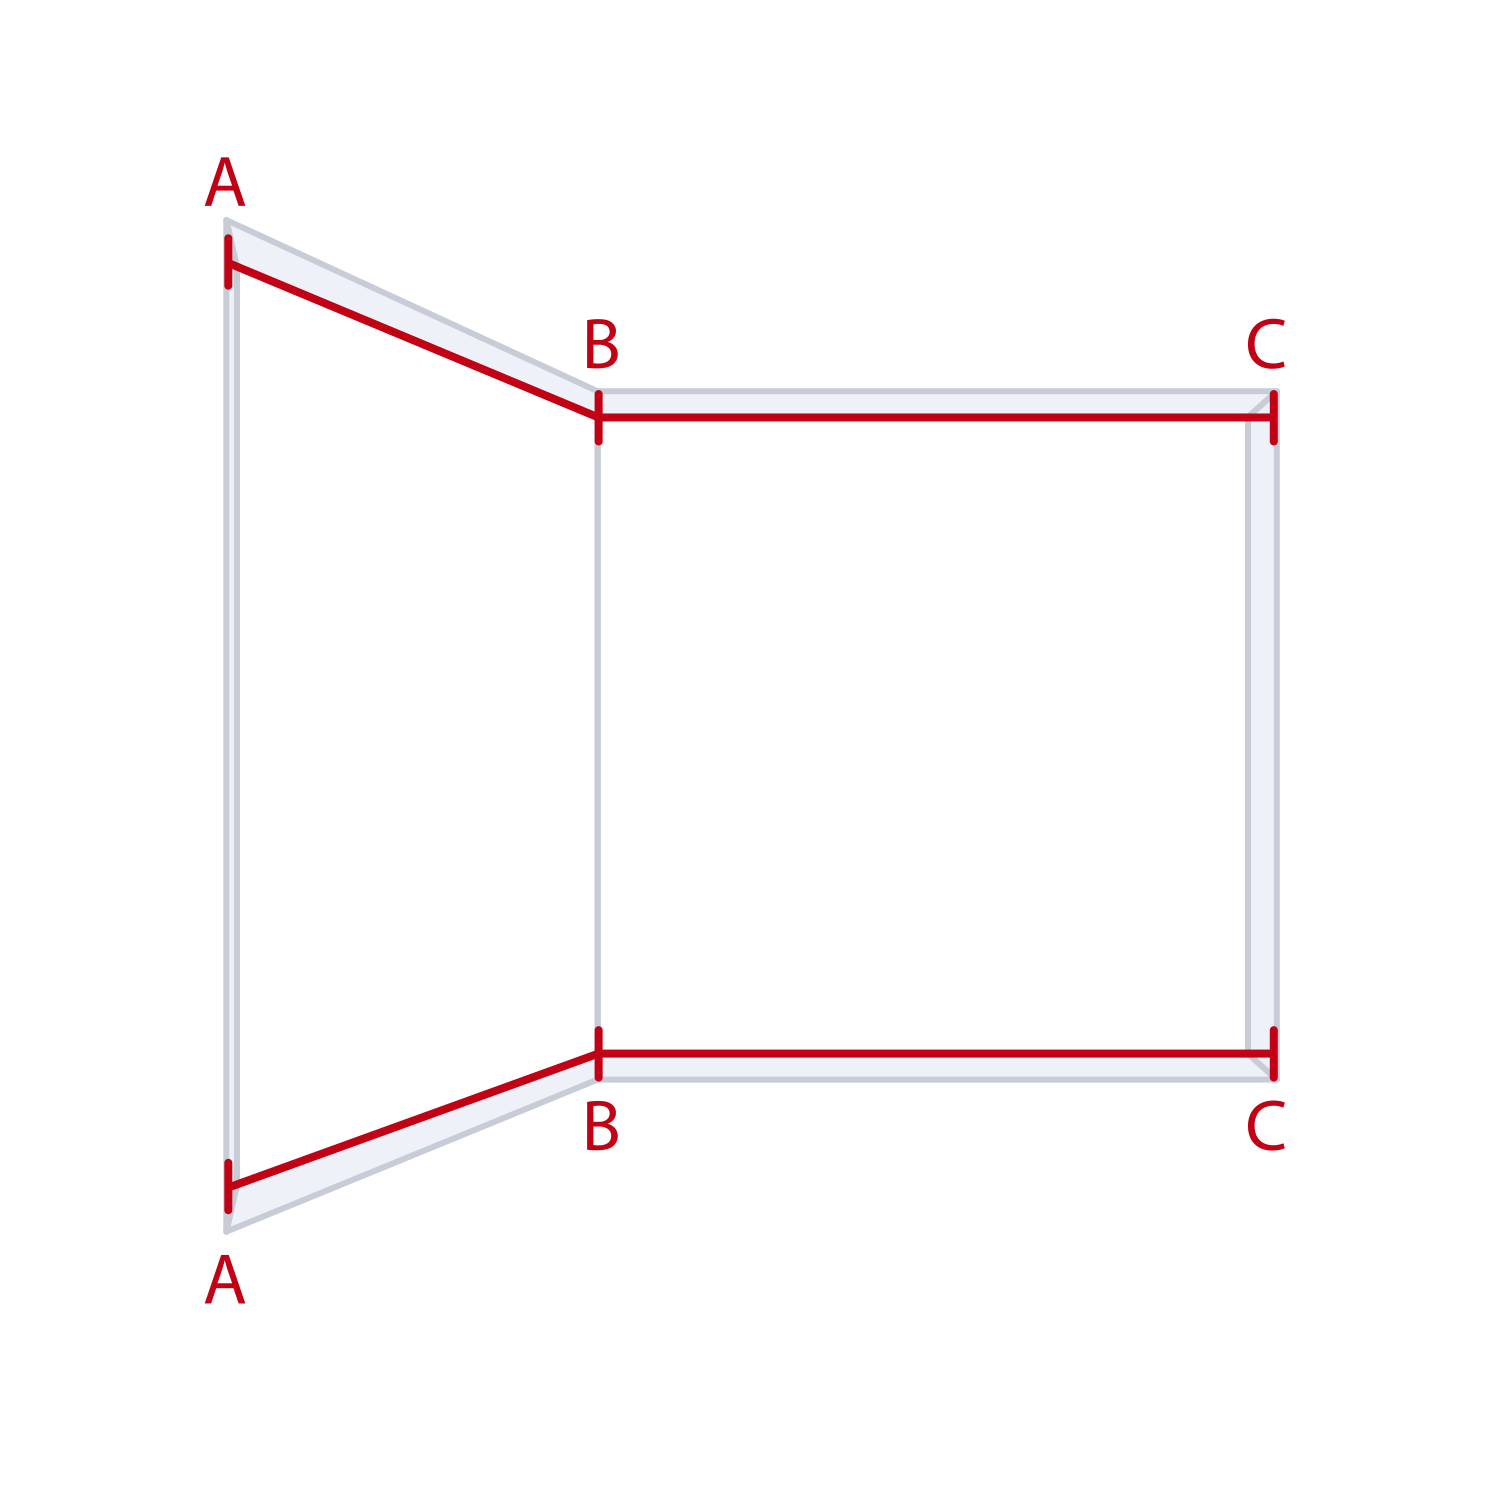
The finished shutter can be designed as one coordinated corner arrangement with a corner post supporting the meeting point. The measurements below are taken as a (A to B) Left window (L) and a (B to C) Right window (R).
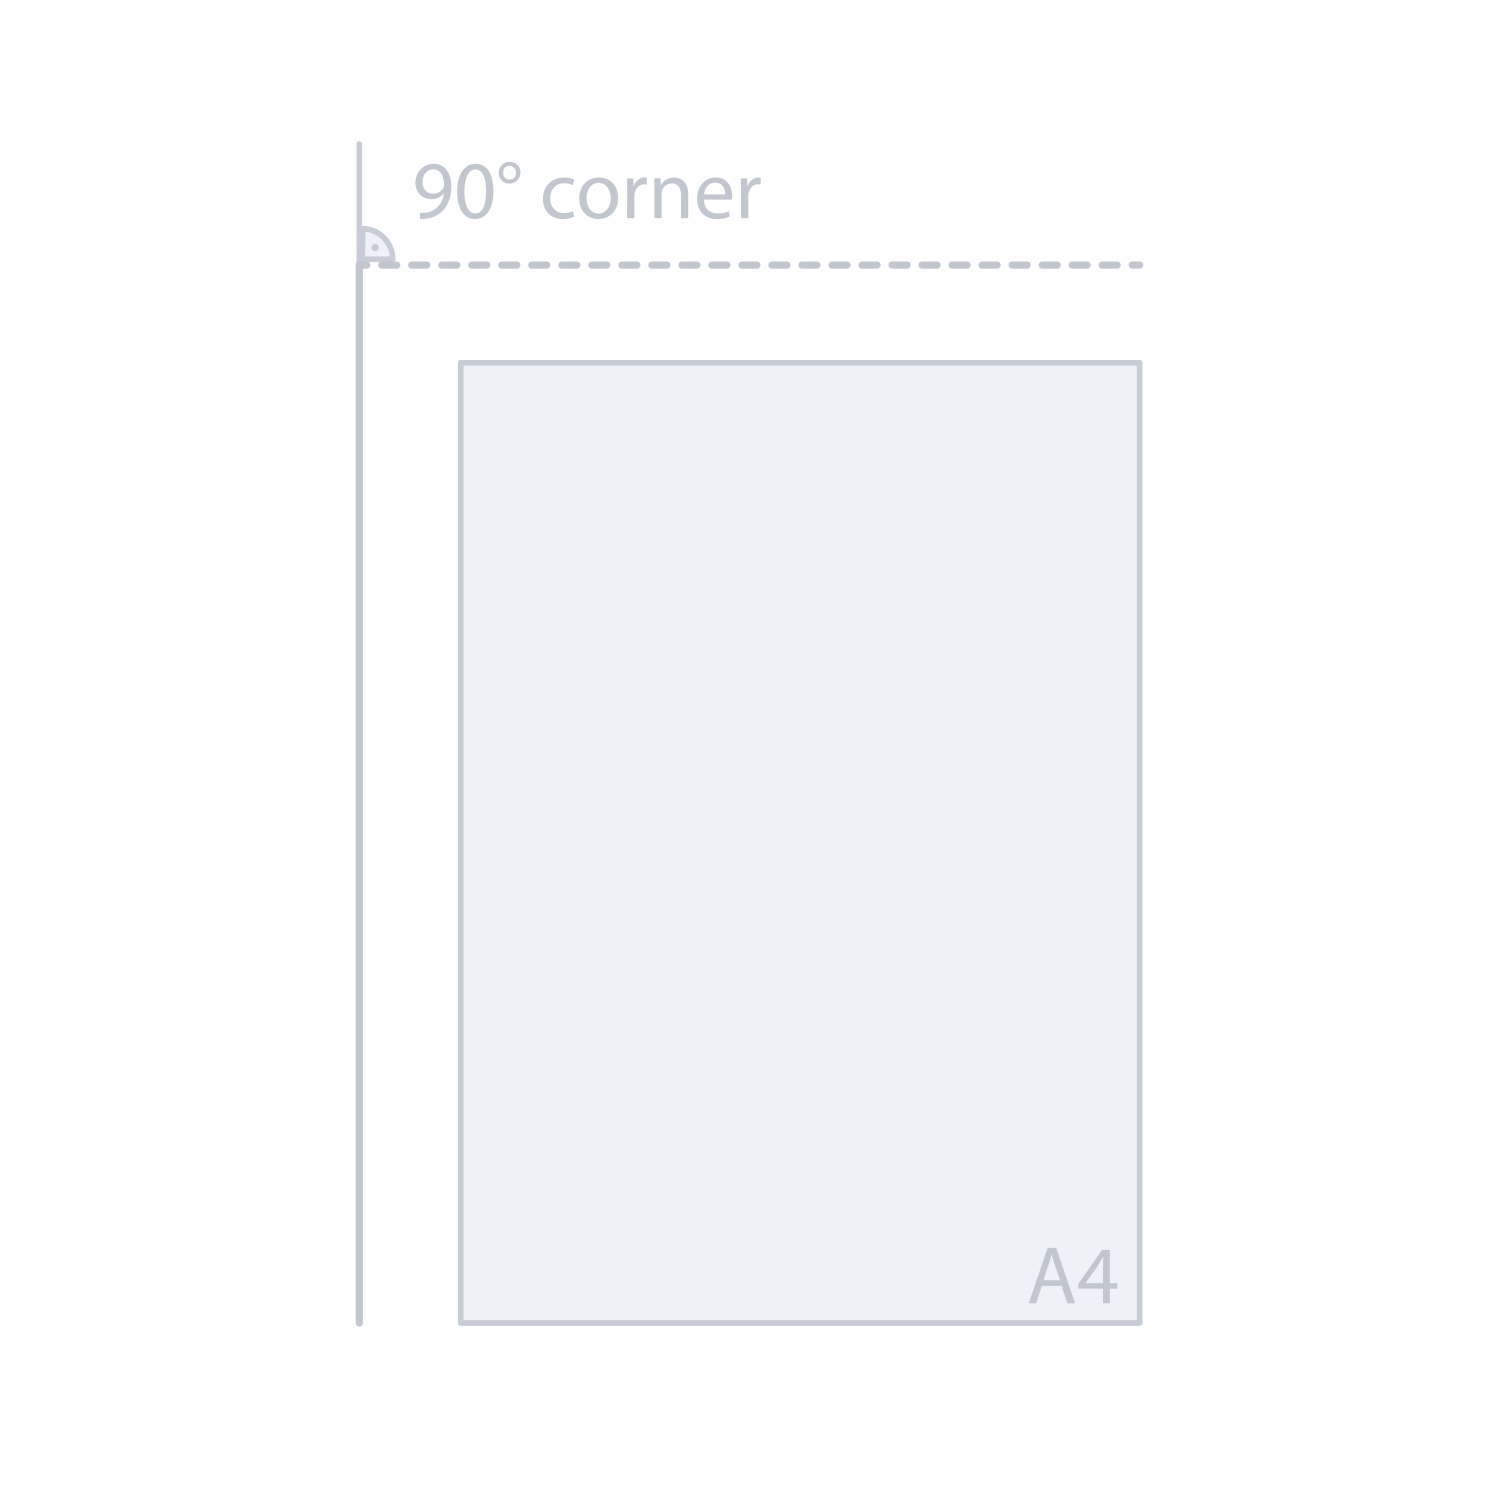
Determine if your corner window is 90 degrees
Check that your corner is in fact 90 degrees by placing an a4 paper in or against the corner.
Measuring for a Corner Window
Corner windows need more care than a single rectangular opening, but the process is easier if you treat each face as a separate window and always work from left to right.
Before measuring, choose whether the shutters will be inside mounted or outside mounted. You will need a metal tape measure, something to record the figures and a pencil for marking the corner reference points.
Important: label the two sections Corner Window L and Corner Window R. Take clear photos with your measurements if the corner construction is unusual so the meeting detail can be checked before manufacture. You can contact us via email or contact form.
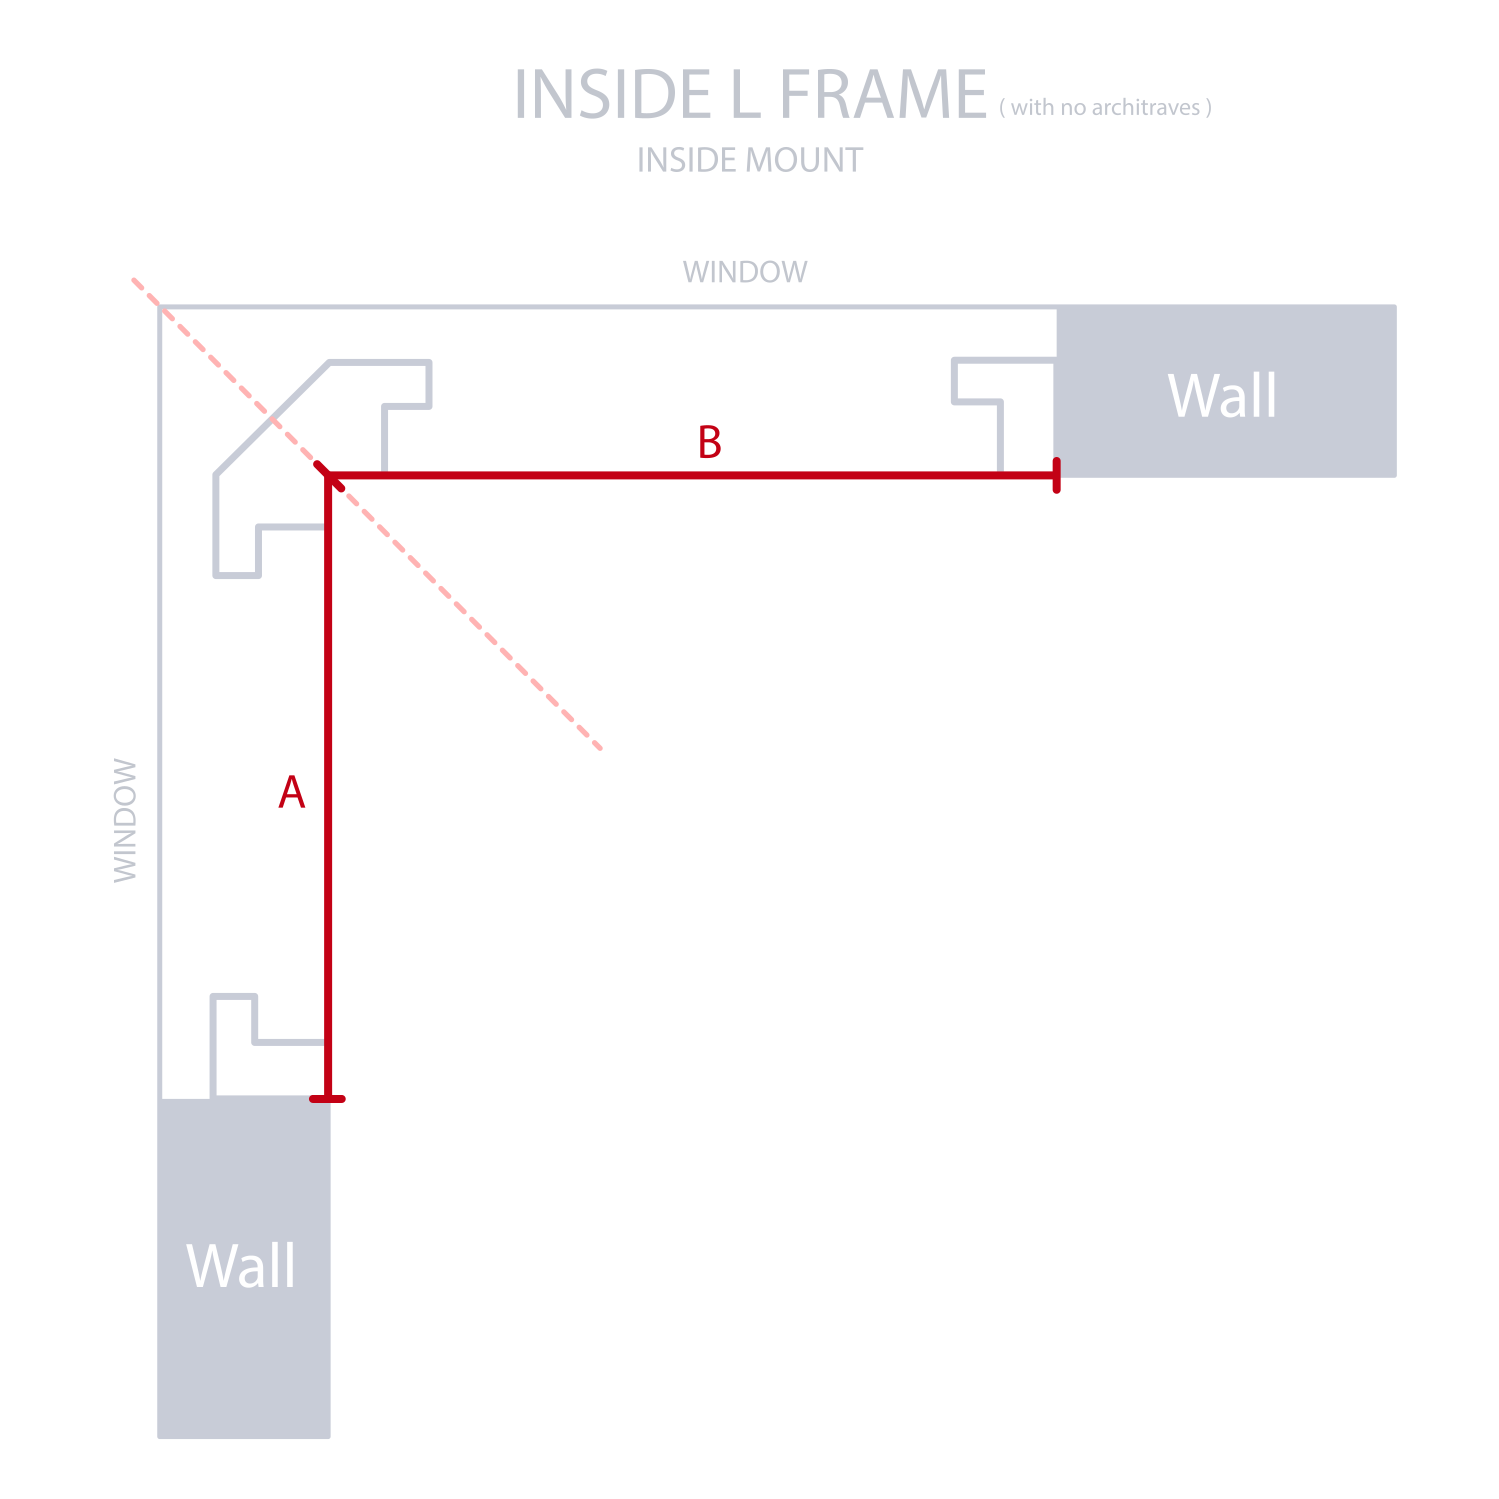
Measuring for an Inside L-Frame
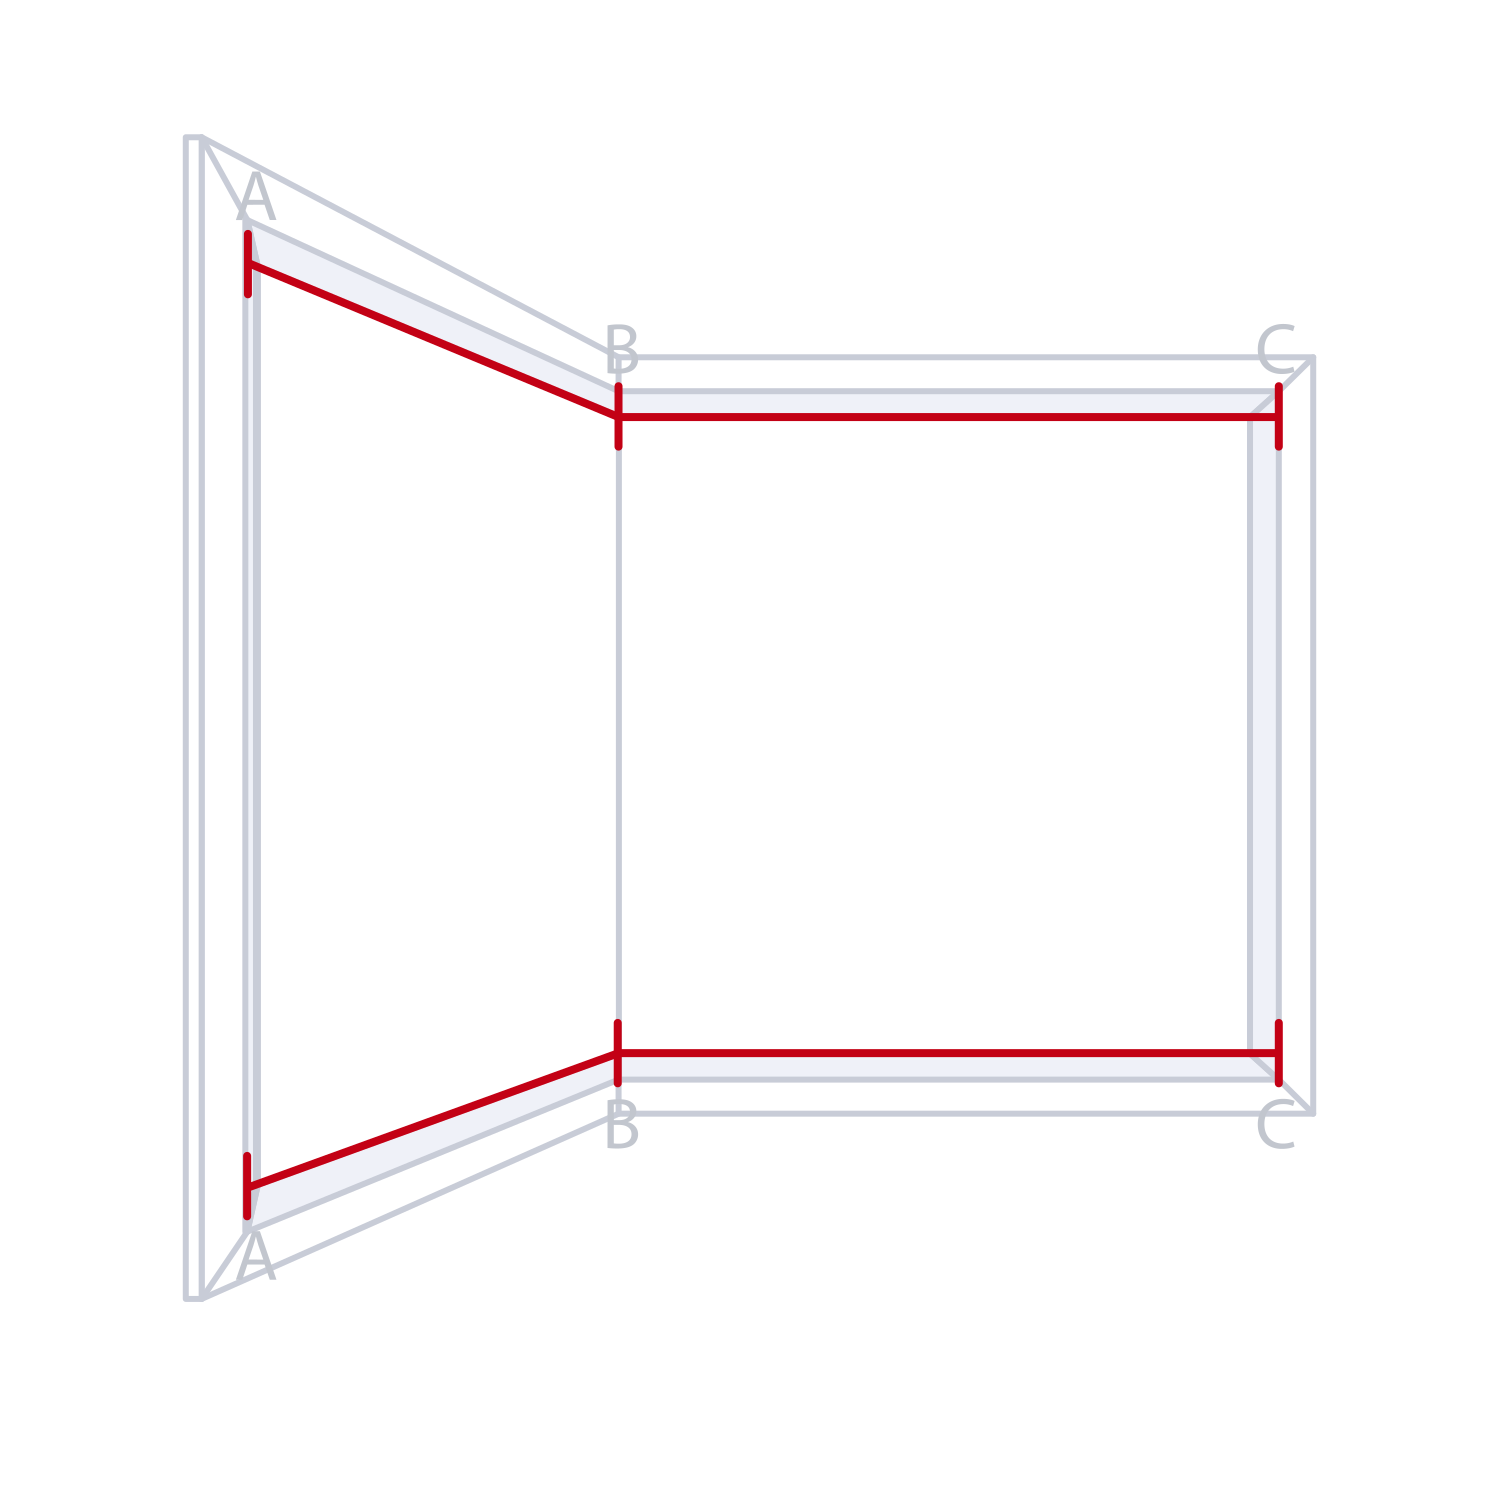
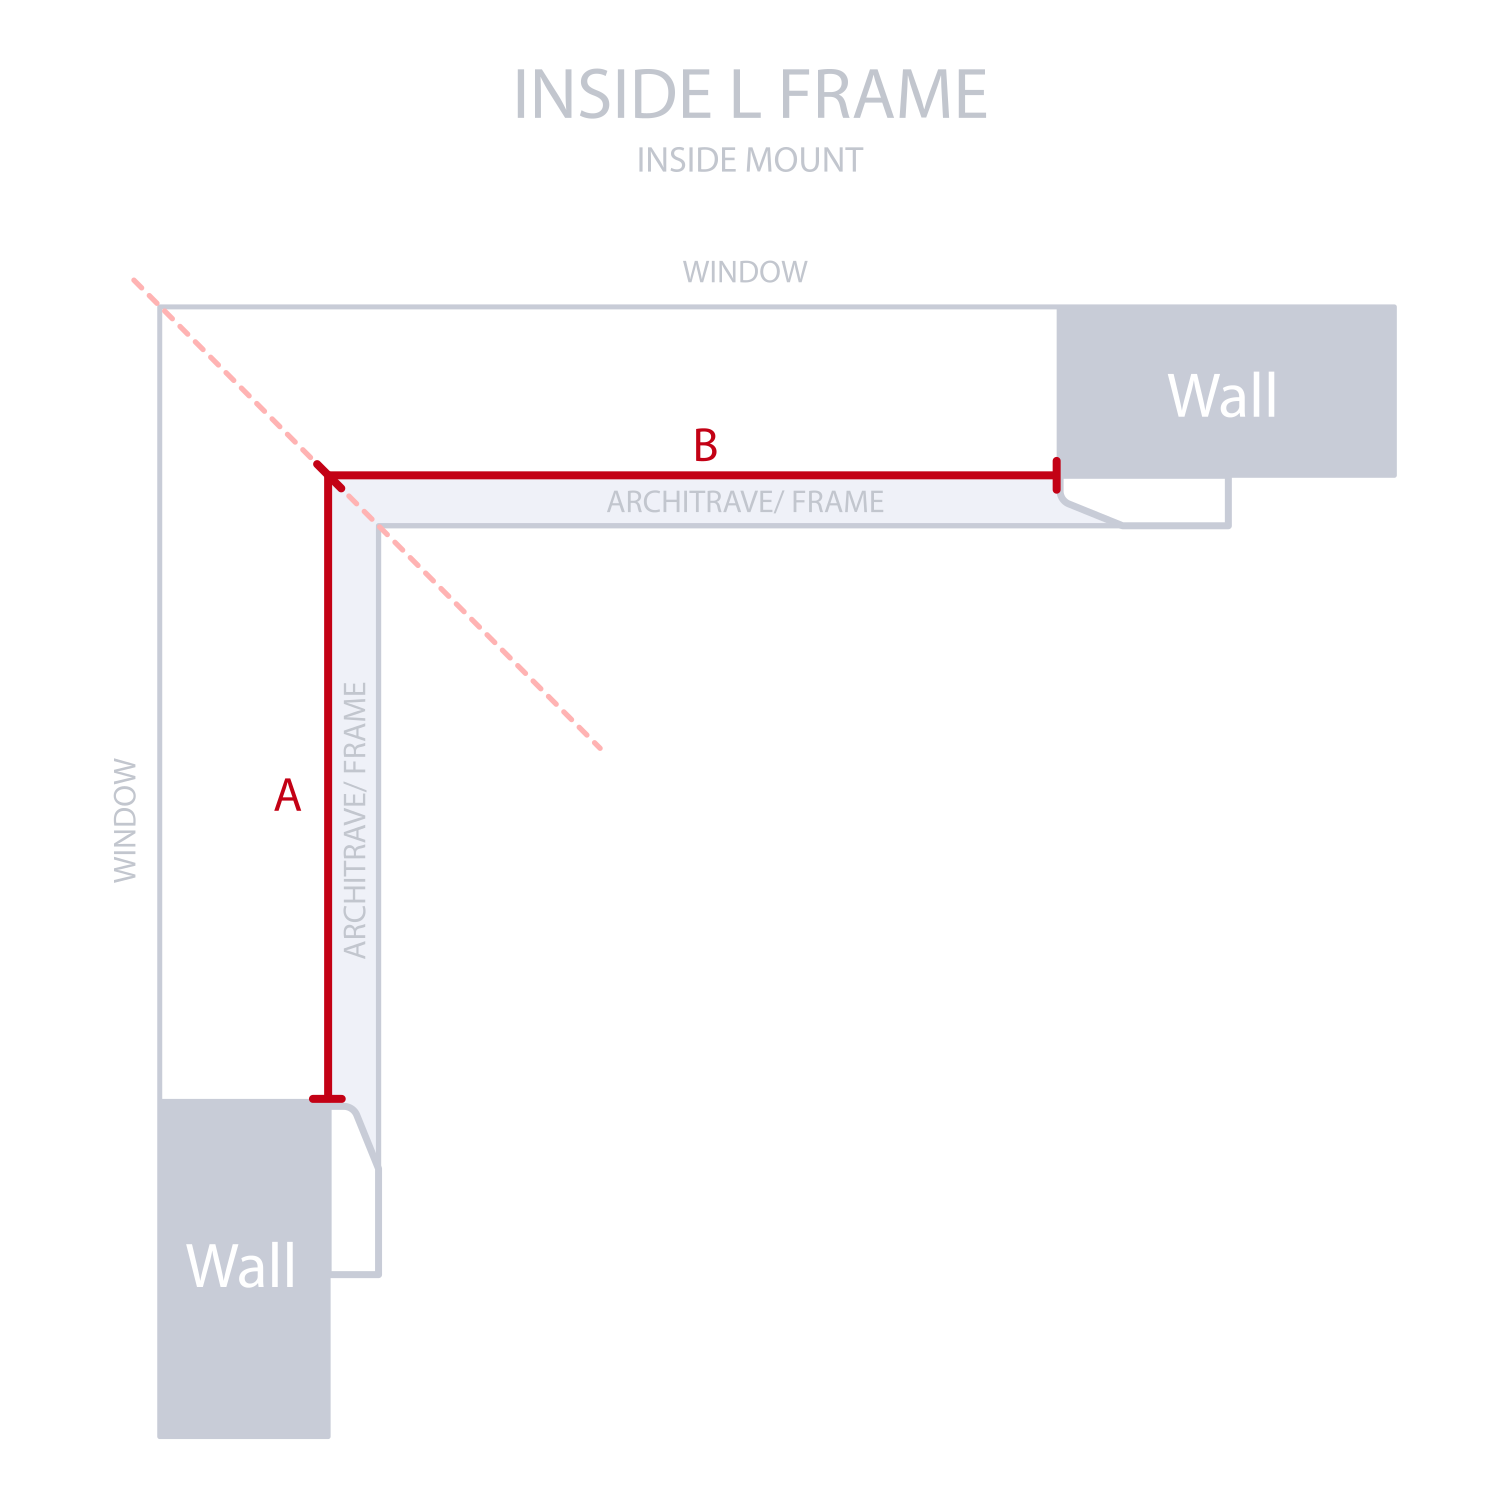
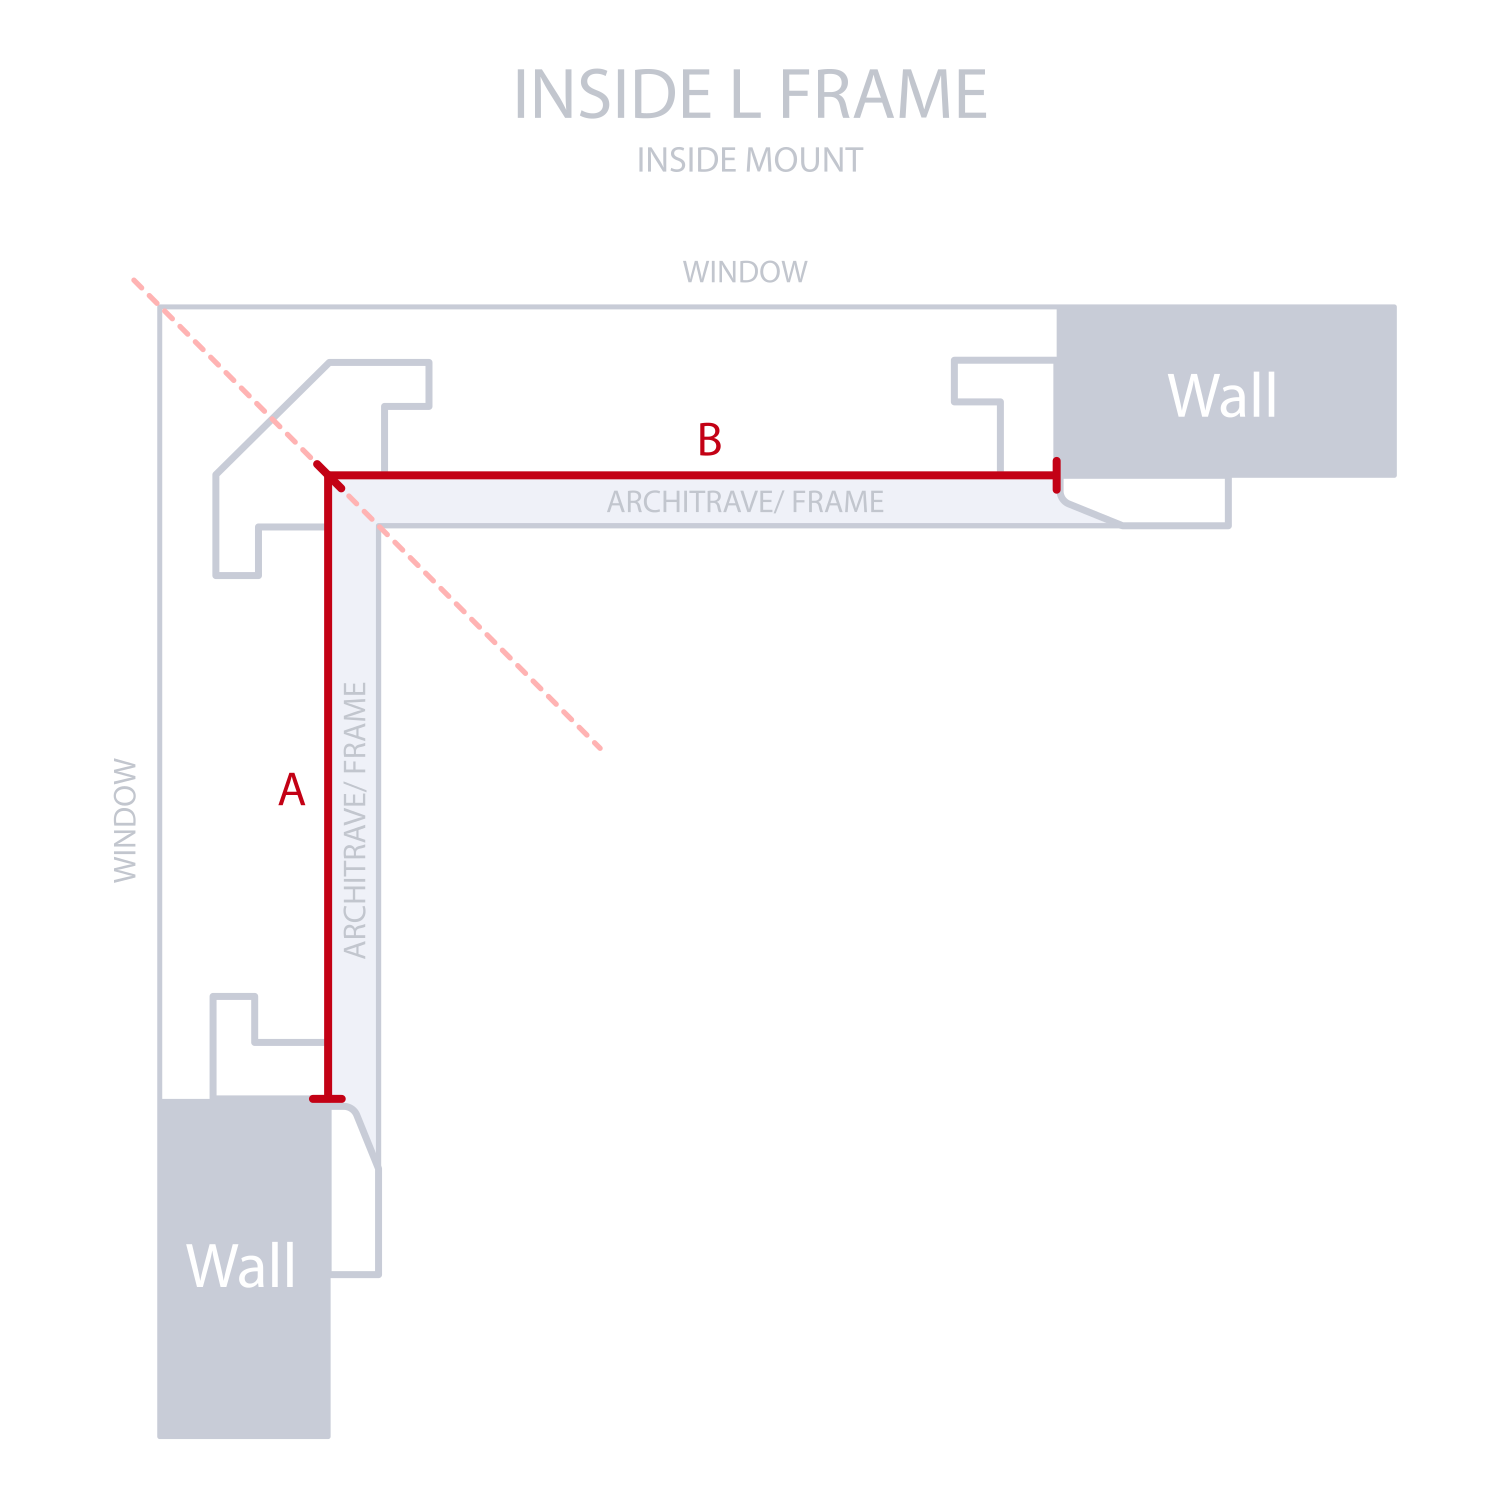
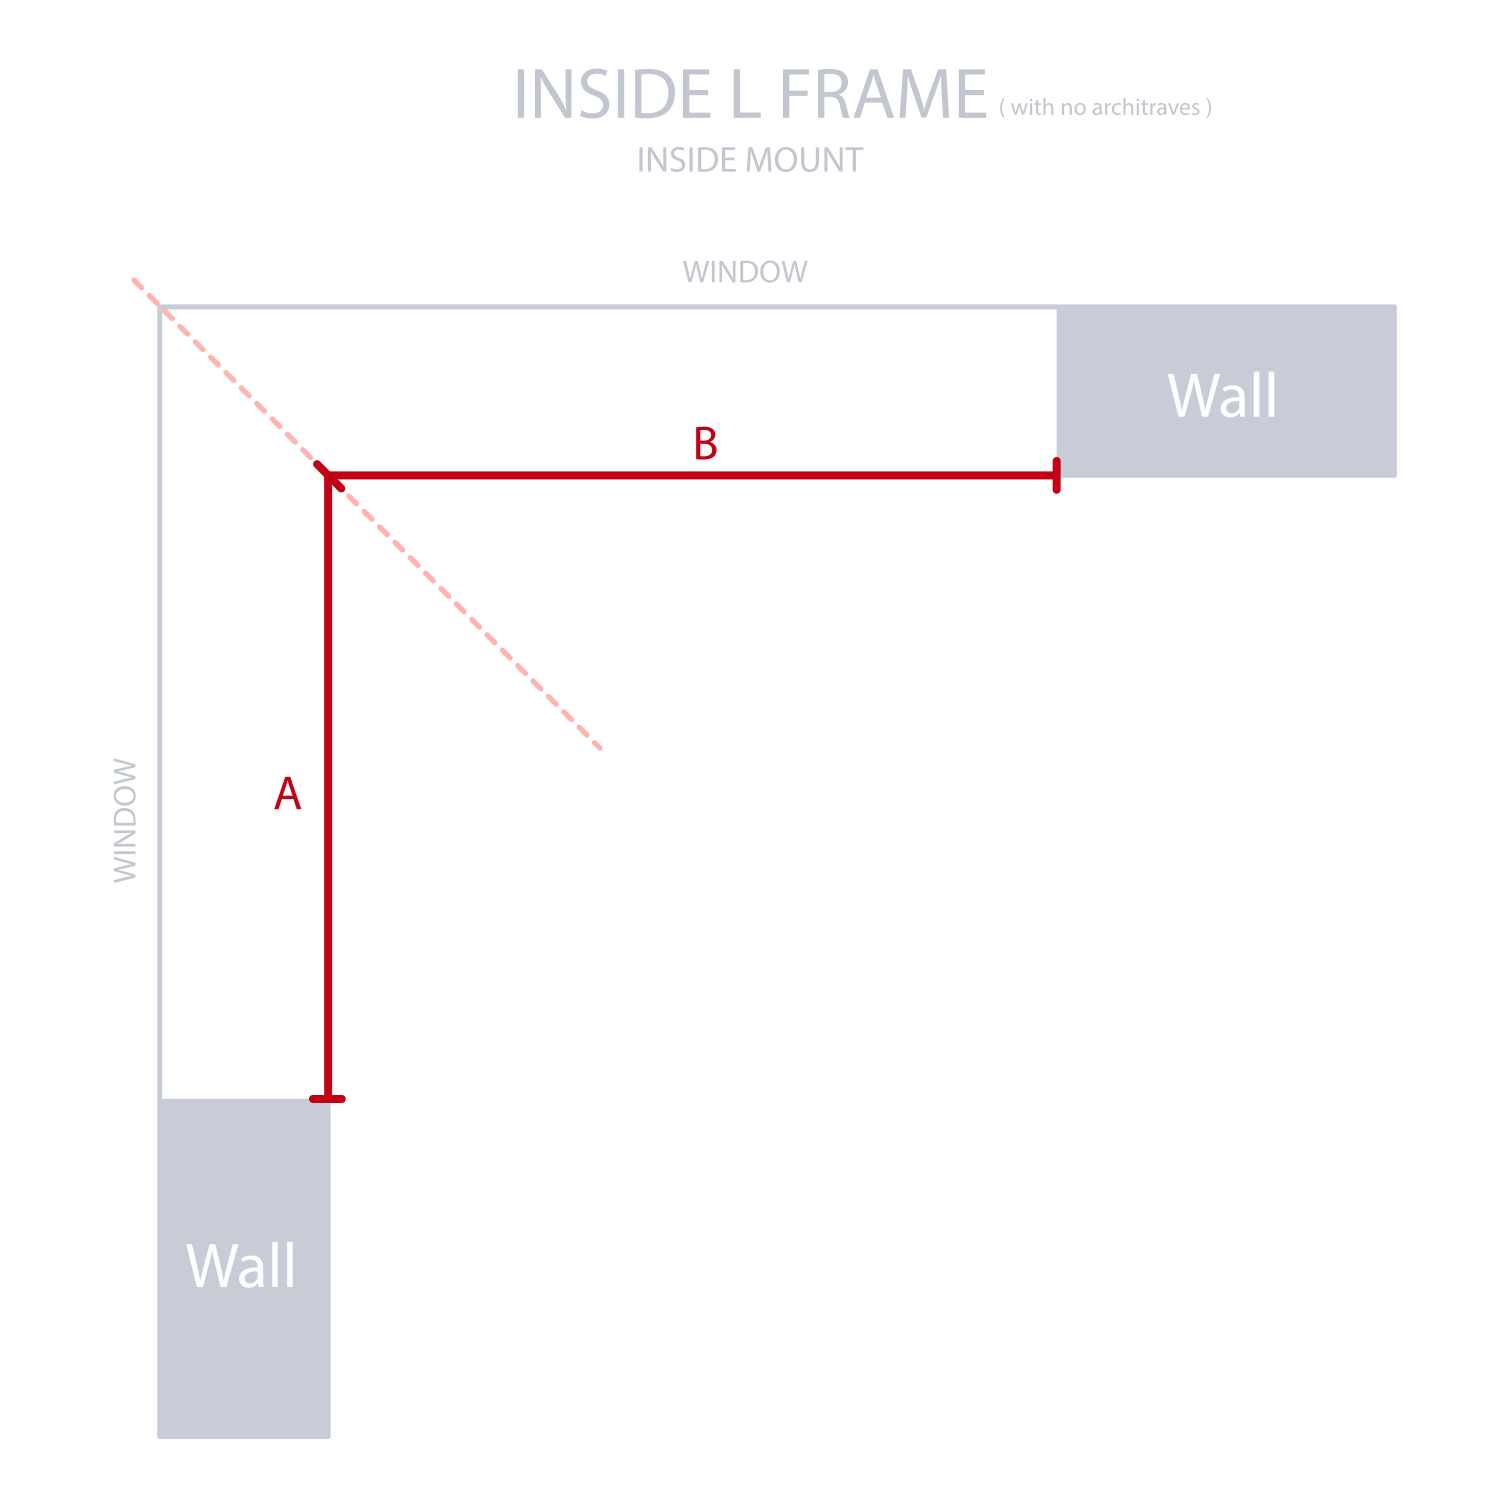
For an Inside L-frame, measurements are taken inside the window recess, using the front edge of the recess rather than measuring back at the glass.
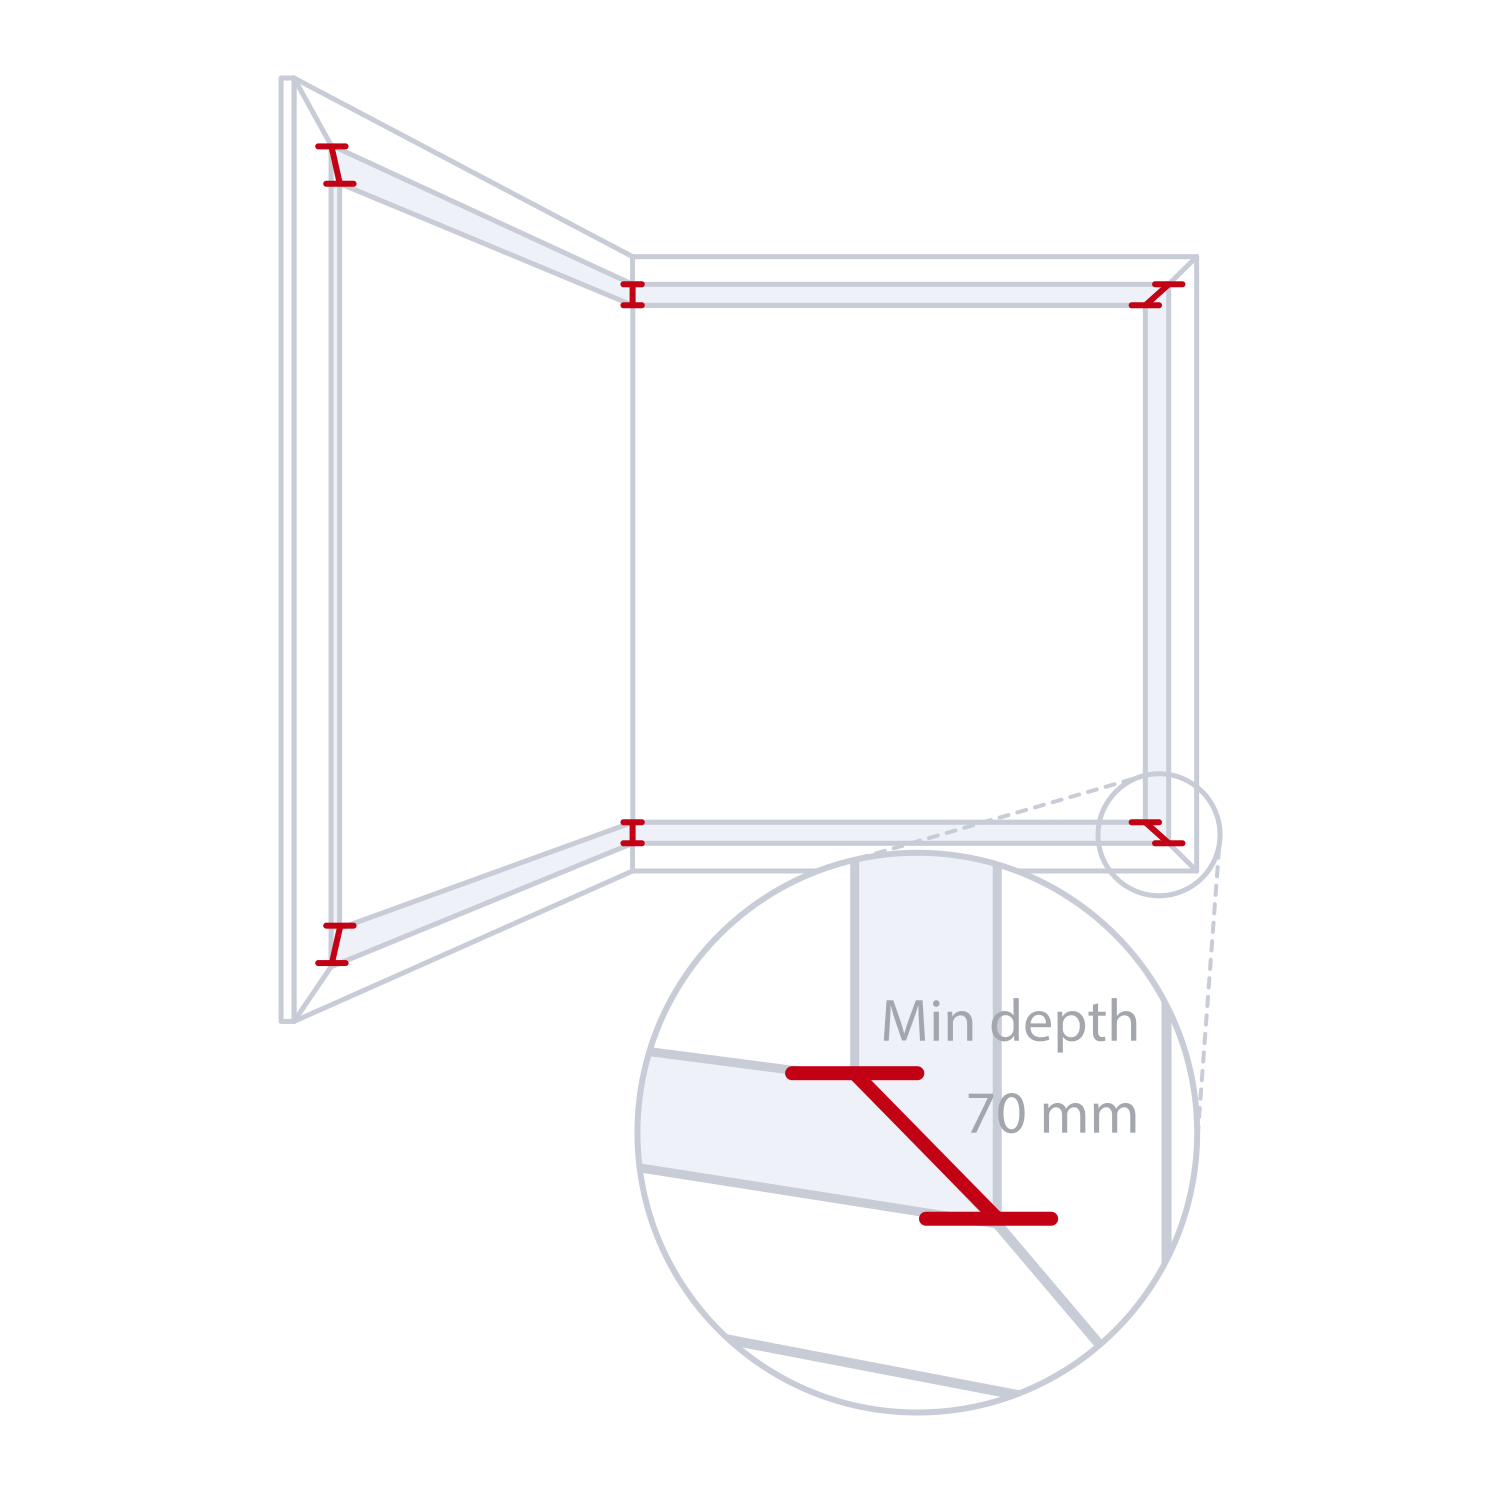
As a simple clearance rule, aim for approximately 70mm of clear recess depth. If the depth is tighter or there are handles, winders or other obstructions, you may still be able to mount the shutter inside with less, check Managing Window Obstructions for more information.
1. Measure the width of the left window (A)
Important: Use the relevant diagram below depending on your window type.
- Begin at the inside edge of the left-hand recess. Take note of the architrave lip in illustrations below if your window has architraves.
- Measure across to the corner where the two recess faces meet.
- Take this width in two positions (Top and Bottom of your window) as windows can vary. Use the smallest of your measurements for each section.
- Mark that corner location as Measure Point A (Left).
2. Measure the width of the right window (B)
- Start at the right end of Measure Point L (A). where A+B meet in the middle section.
- Measure to the inside edge at the far end of the right-hand recess. Take note of the architrave lip in illustrations below if your window has architraves.
- Take this width in two positions (Top and Bottom of your window) as windows can vary. Use the smallest of your measurements for each section.
- Mark that corner location as Measure Point B (Right).
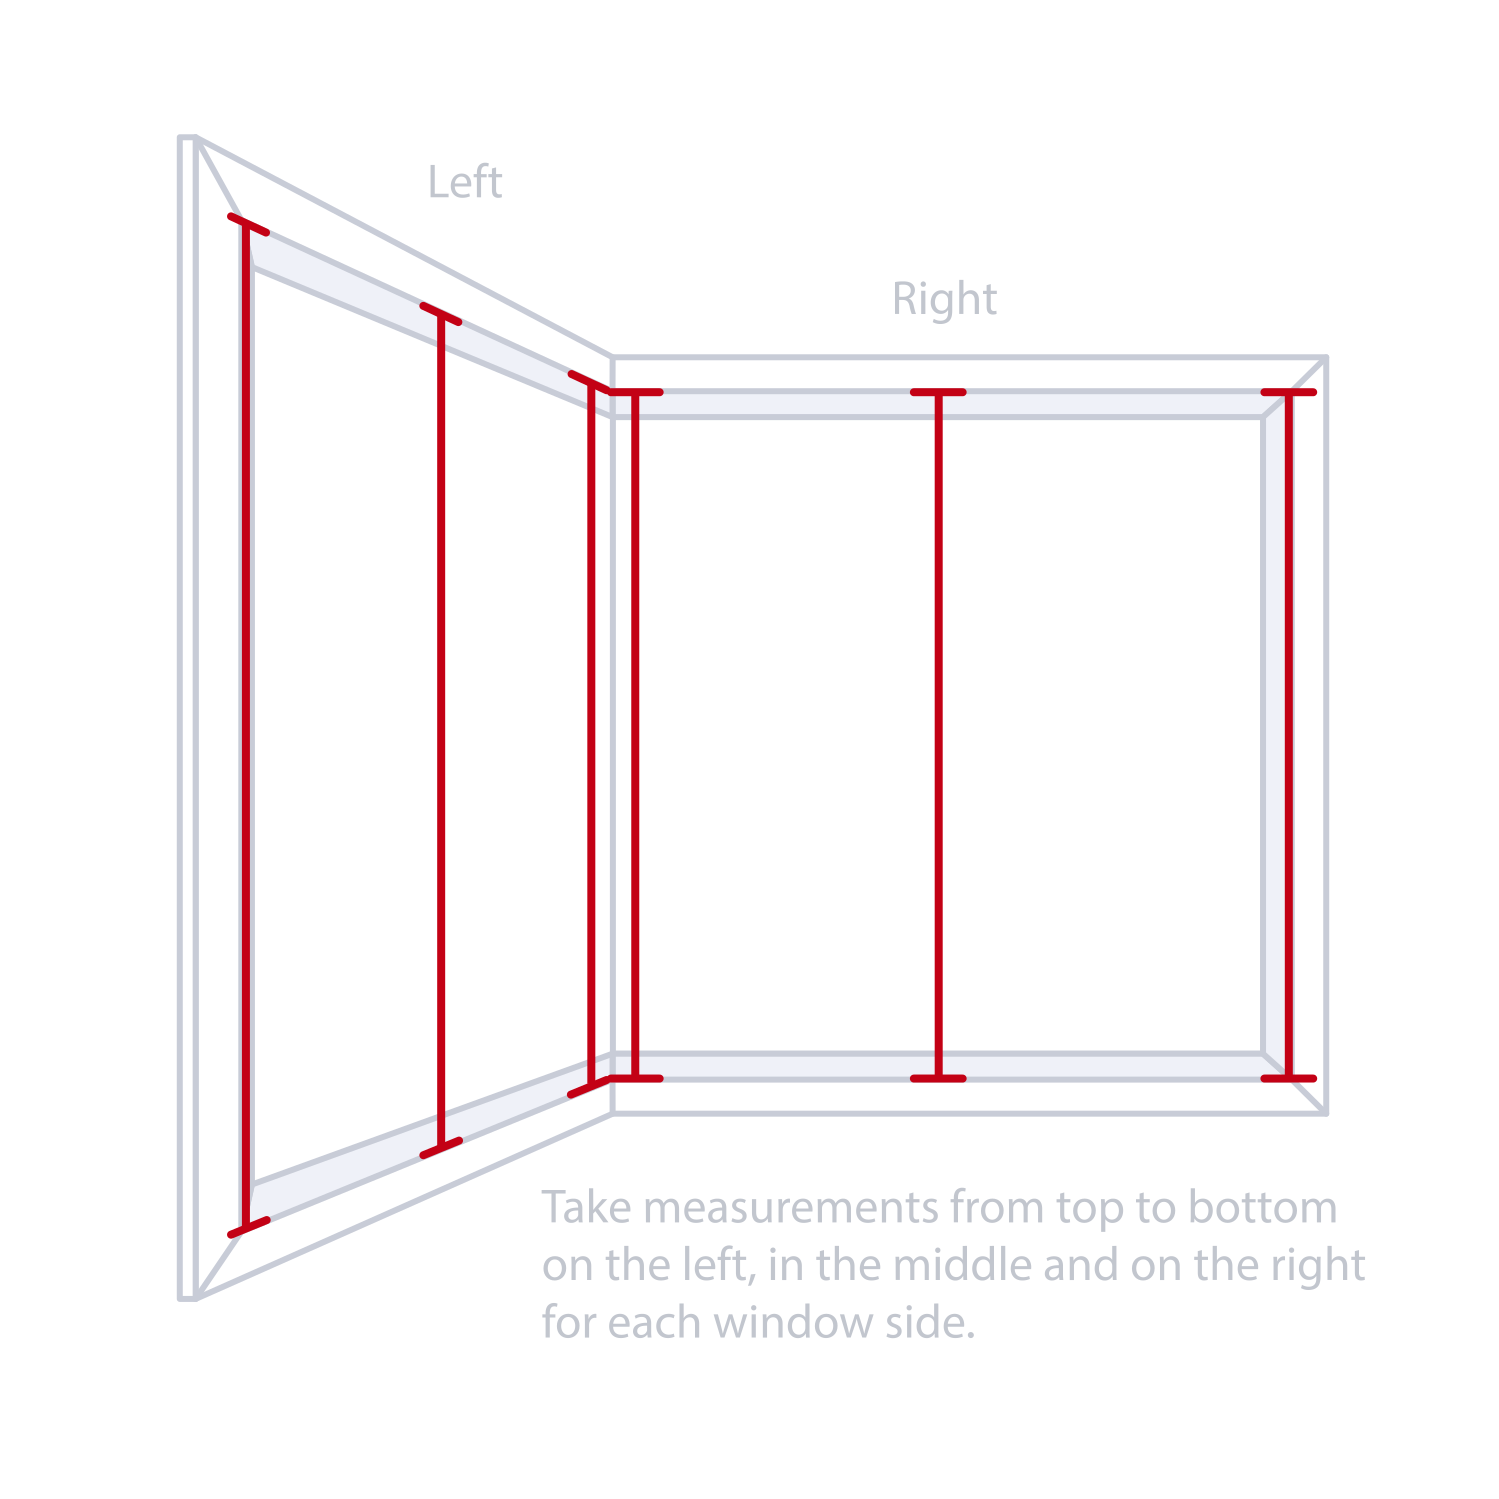
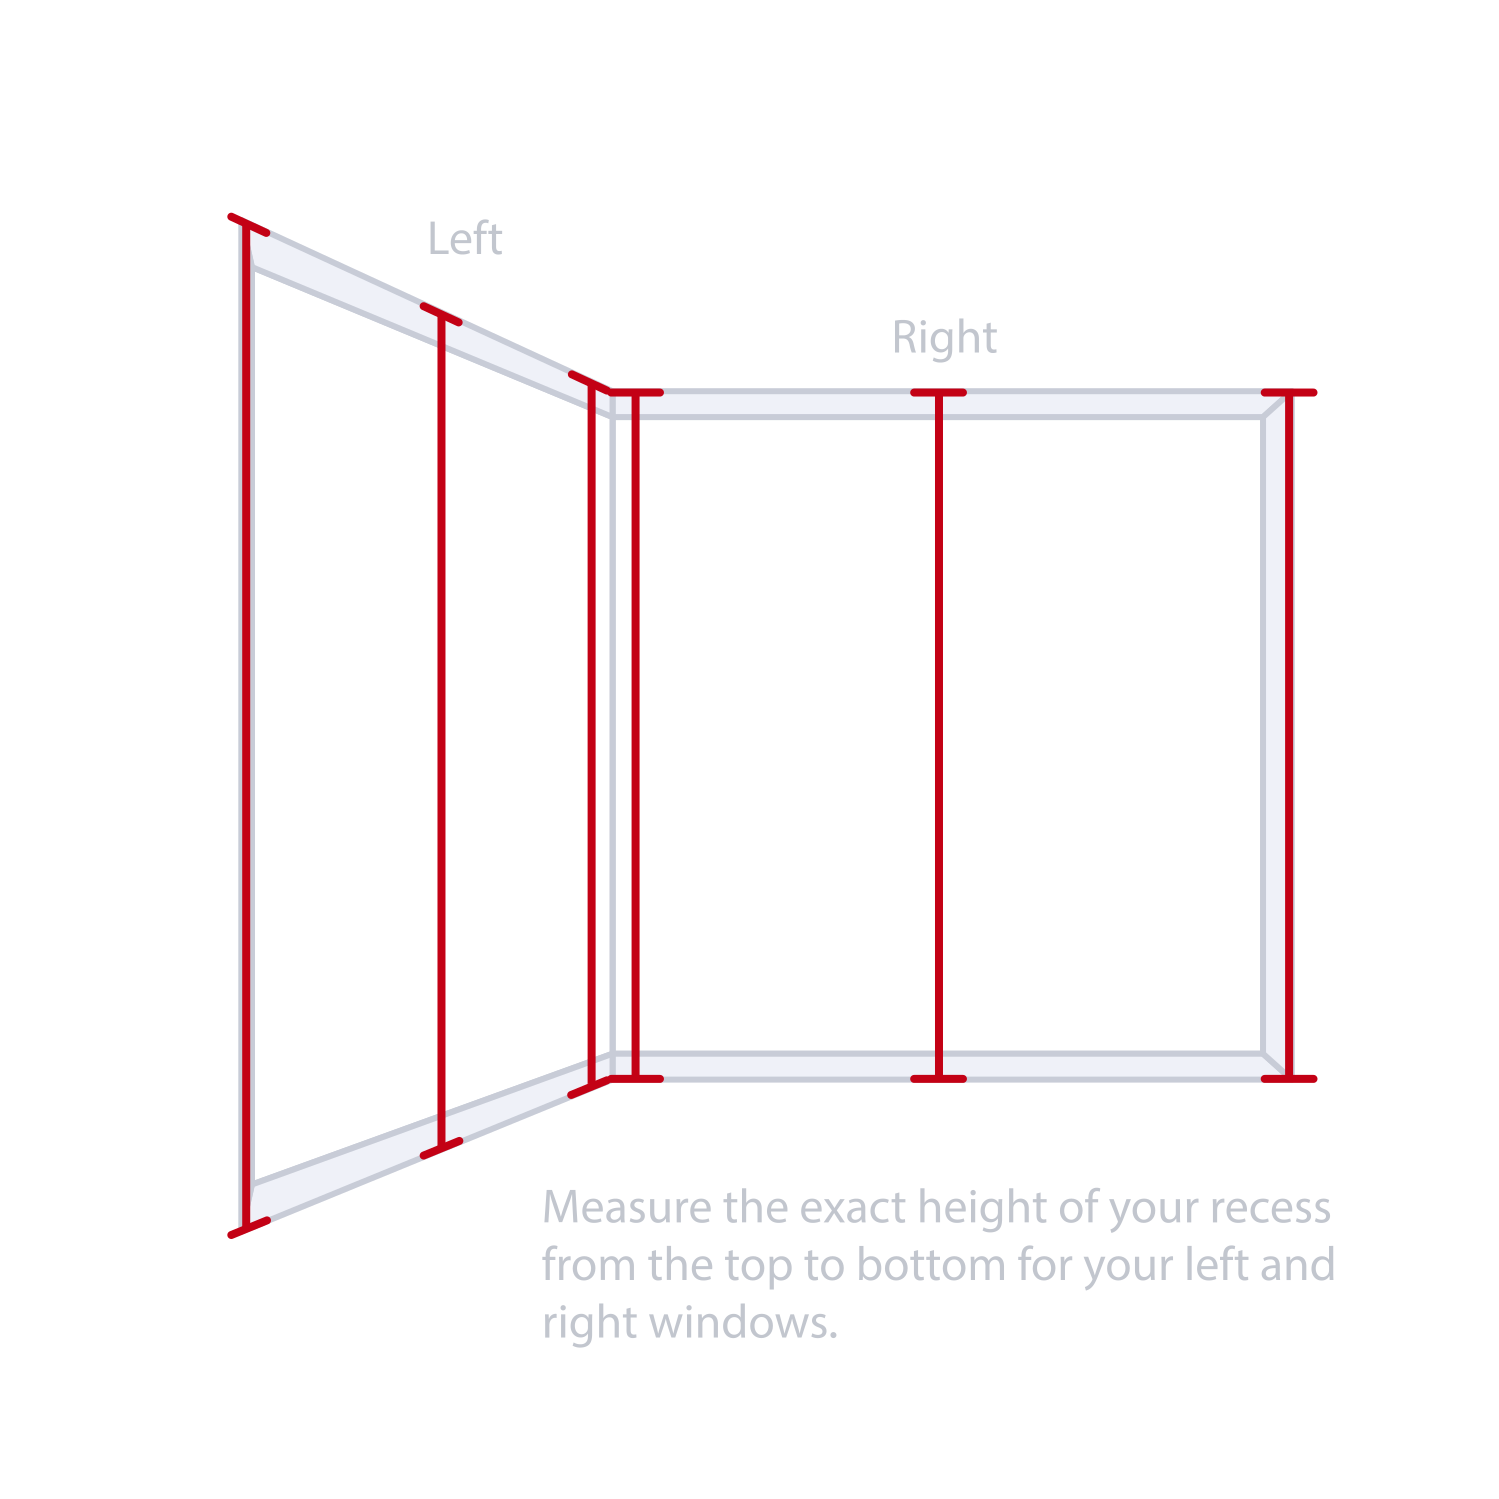
3. Measure the drop
Measure from bottom to top in three different positions across each opening.
4. Record the smallest drop
Use the smallest of the three drop measurements. Enter the measured figure only—do not make your own manufacturing deduction.
Windows With a Sill or Full-Length Windows
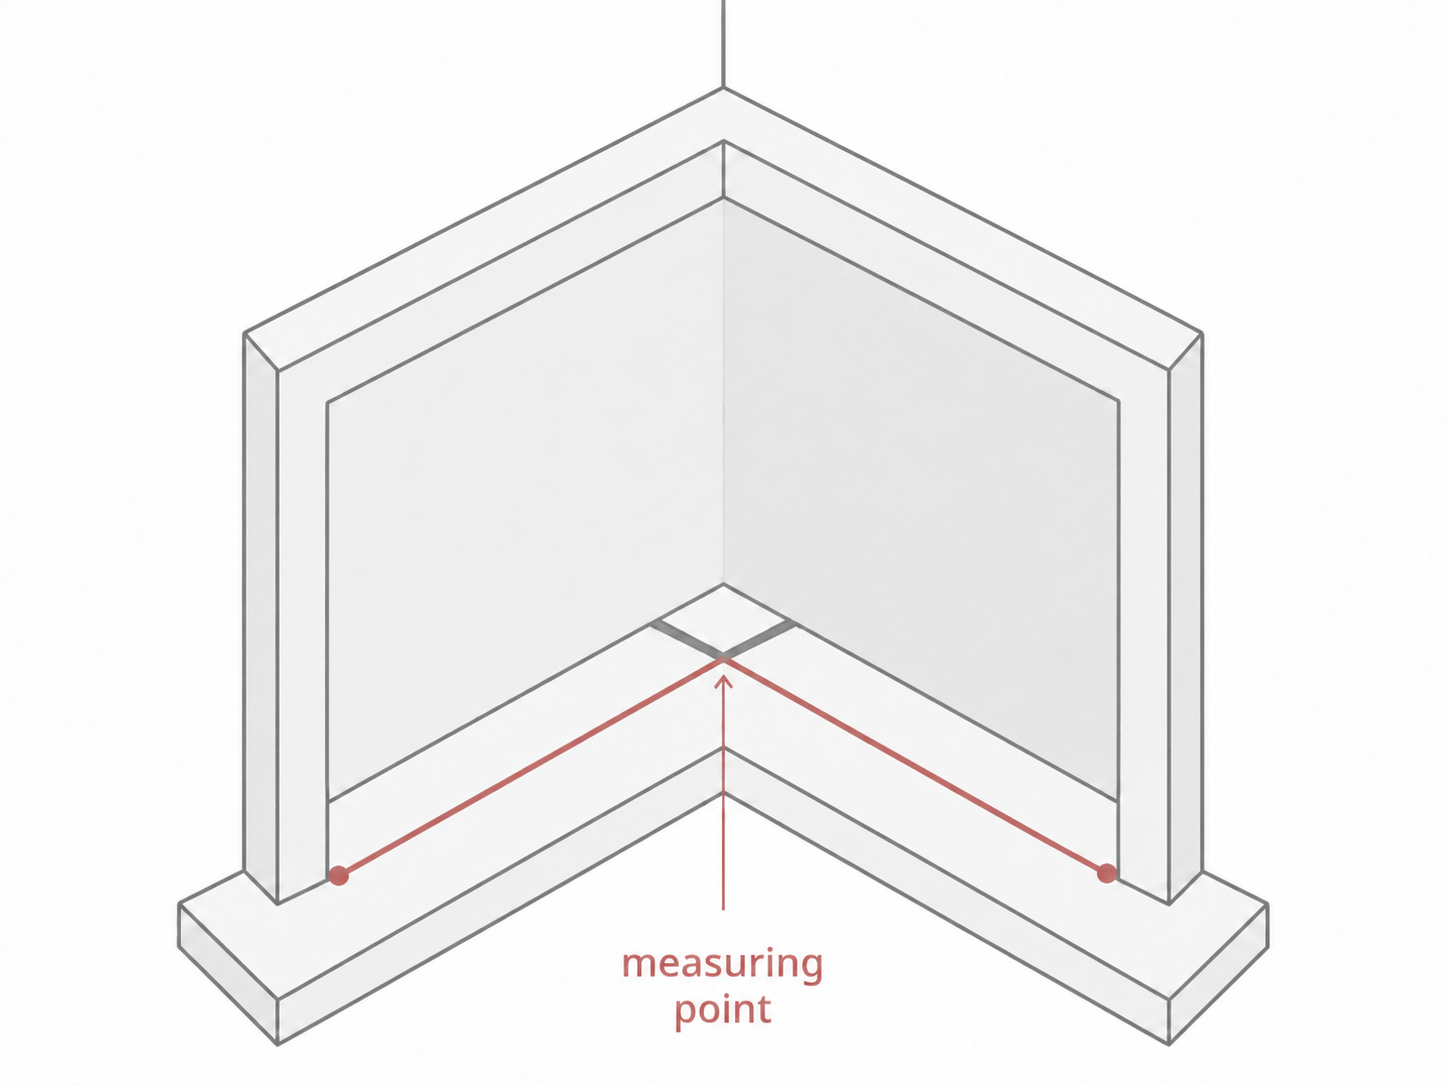
A projecting window sill, or a full-height opening where there is no simple front corner edge to work from, means you first need to establish a consistent measuring point through the corner.
1–4. Establish the corner measuring point
- Start from the left-hand recess.
- Run a straight piece of string along the sill or lower reference line toward the opposite window pane and keep it in position.
- Repeat from the right-hand recess with a second piece of string.
- The intersection of the two lines establishes the corner reference used for the left and right widths.
If measuring a full length window to the floor, use the same premise as above, and imagine the window sill is the floor.
5. Check the measuring point
Check the clearance to the window in four positions around the reference point. The clearances should agree. If they do not, adjust the string position slightly and check again until the reference is consistent.
6. Measure the left and right widths
Once the reference point is confirmed, follow the Inside L-frame width method above for Window L and Window R, using this point as the shared corner reference.
7. Ordering
To order, enter your measurements for each separate window section that makes up the corner window (A + B) on the ordering page and tick the “Bay / Corner” window option. You will then have A and B as separate items in your cart, enter the same room name and which side the window is so we can match them.
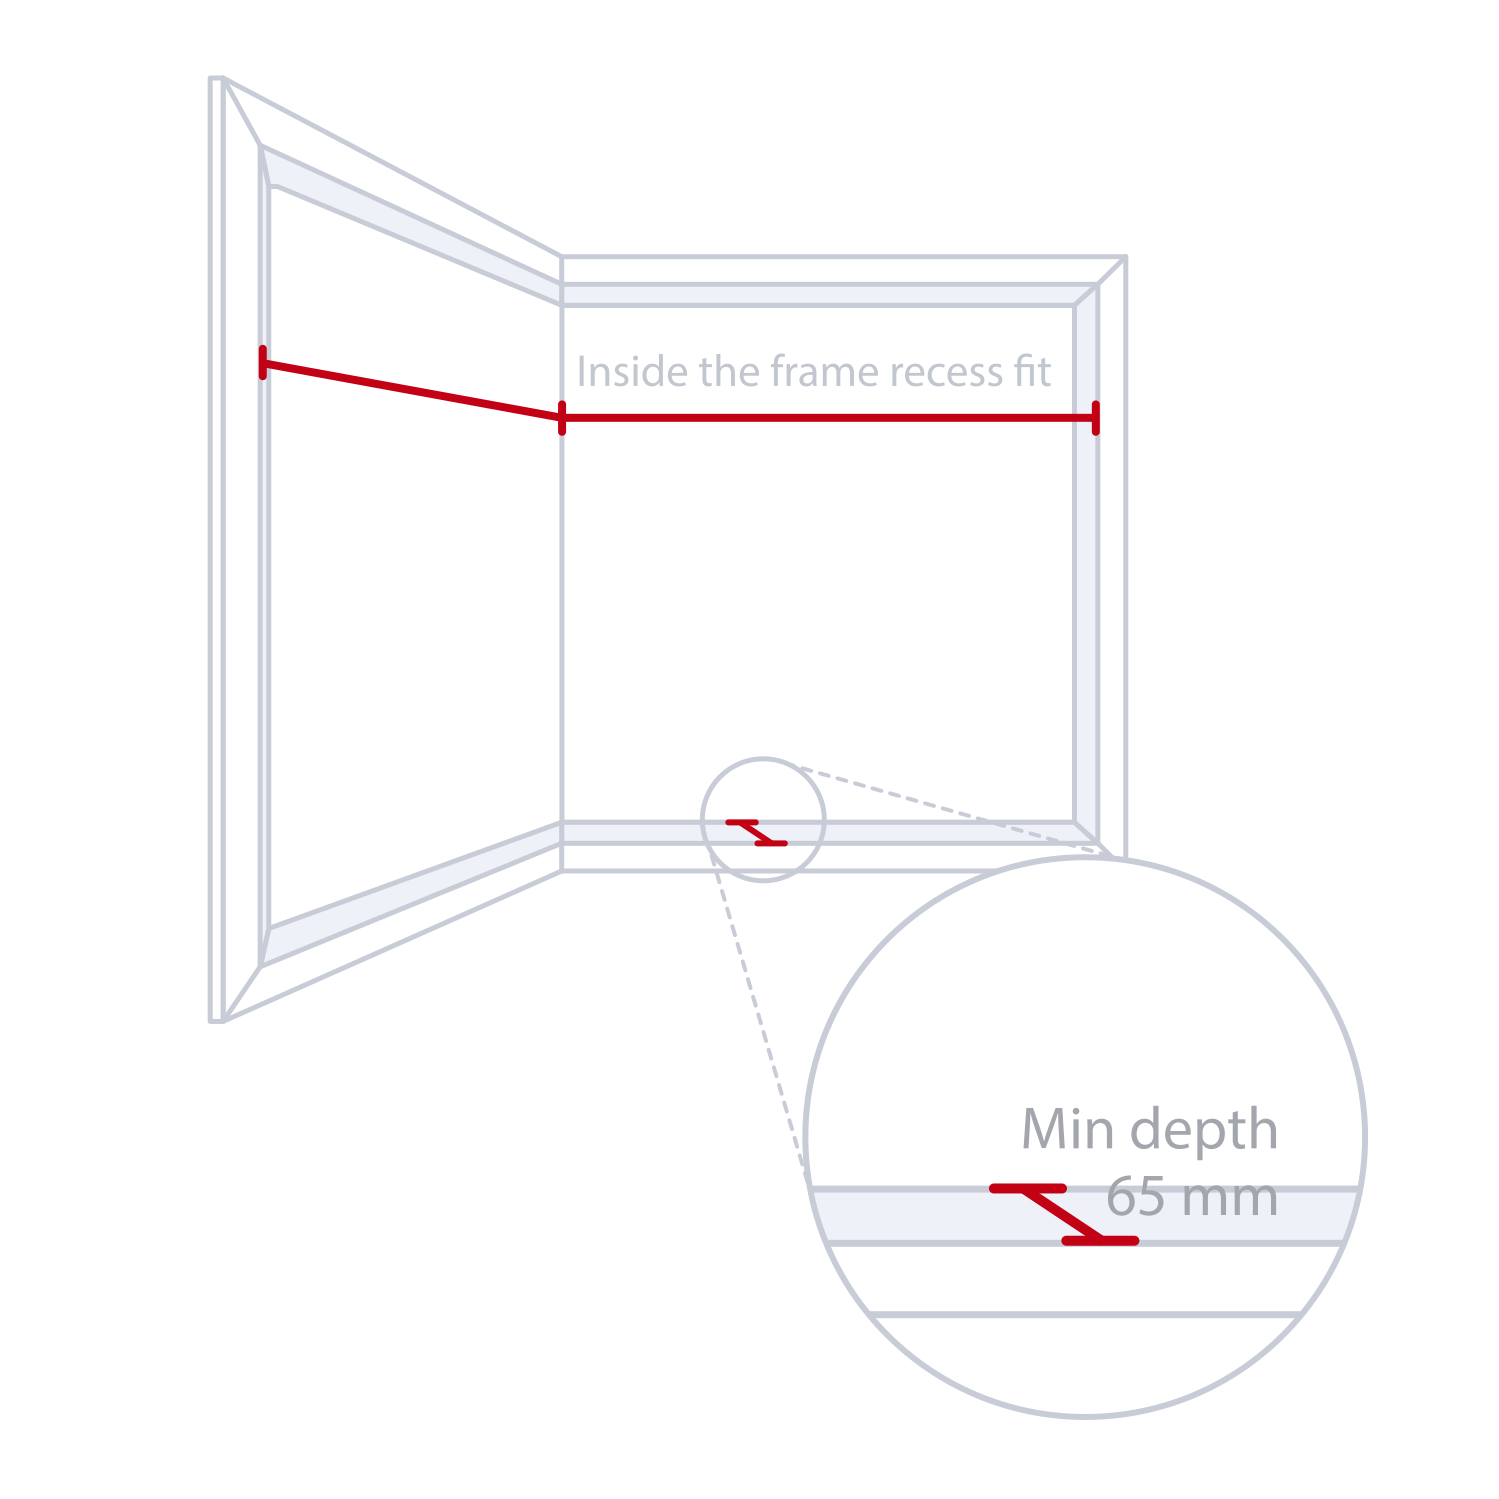
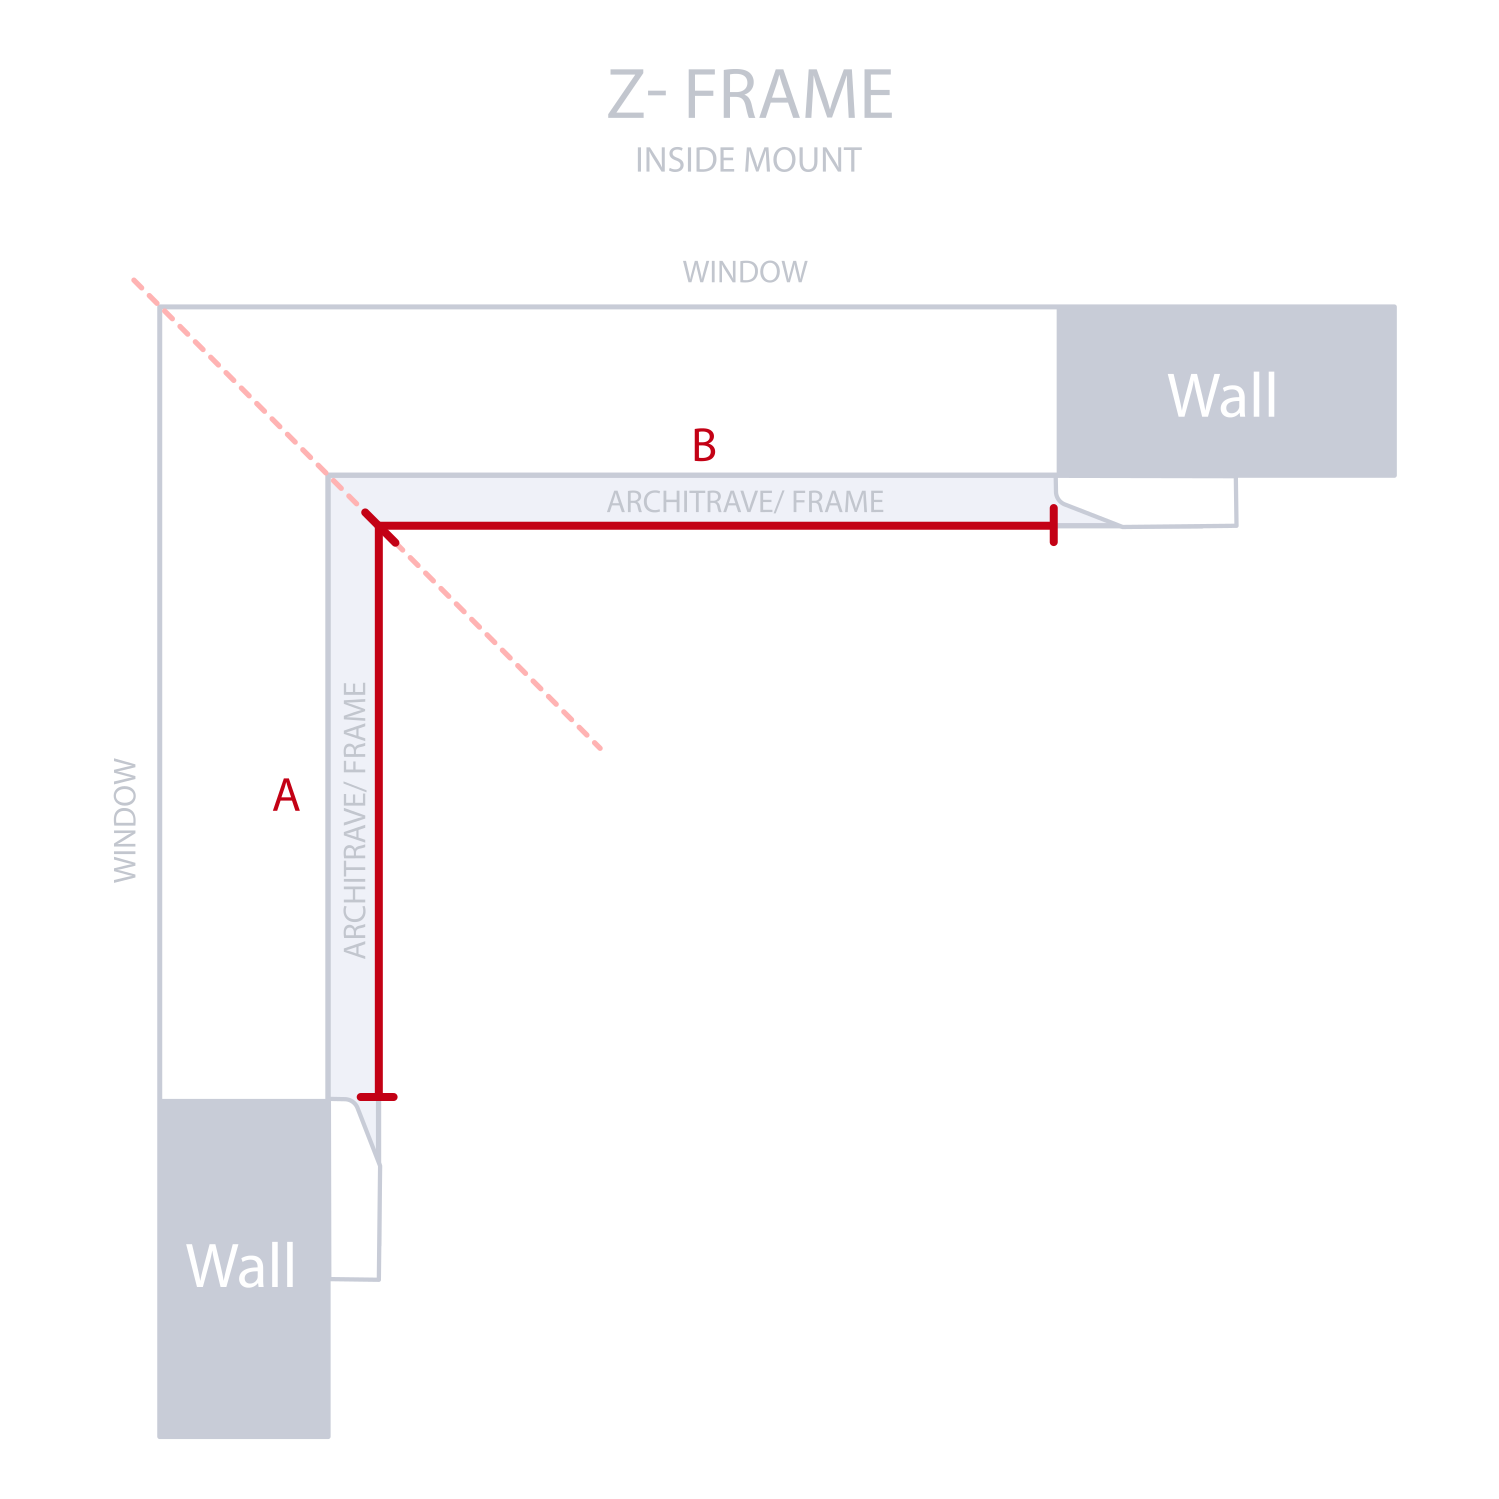
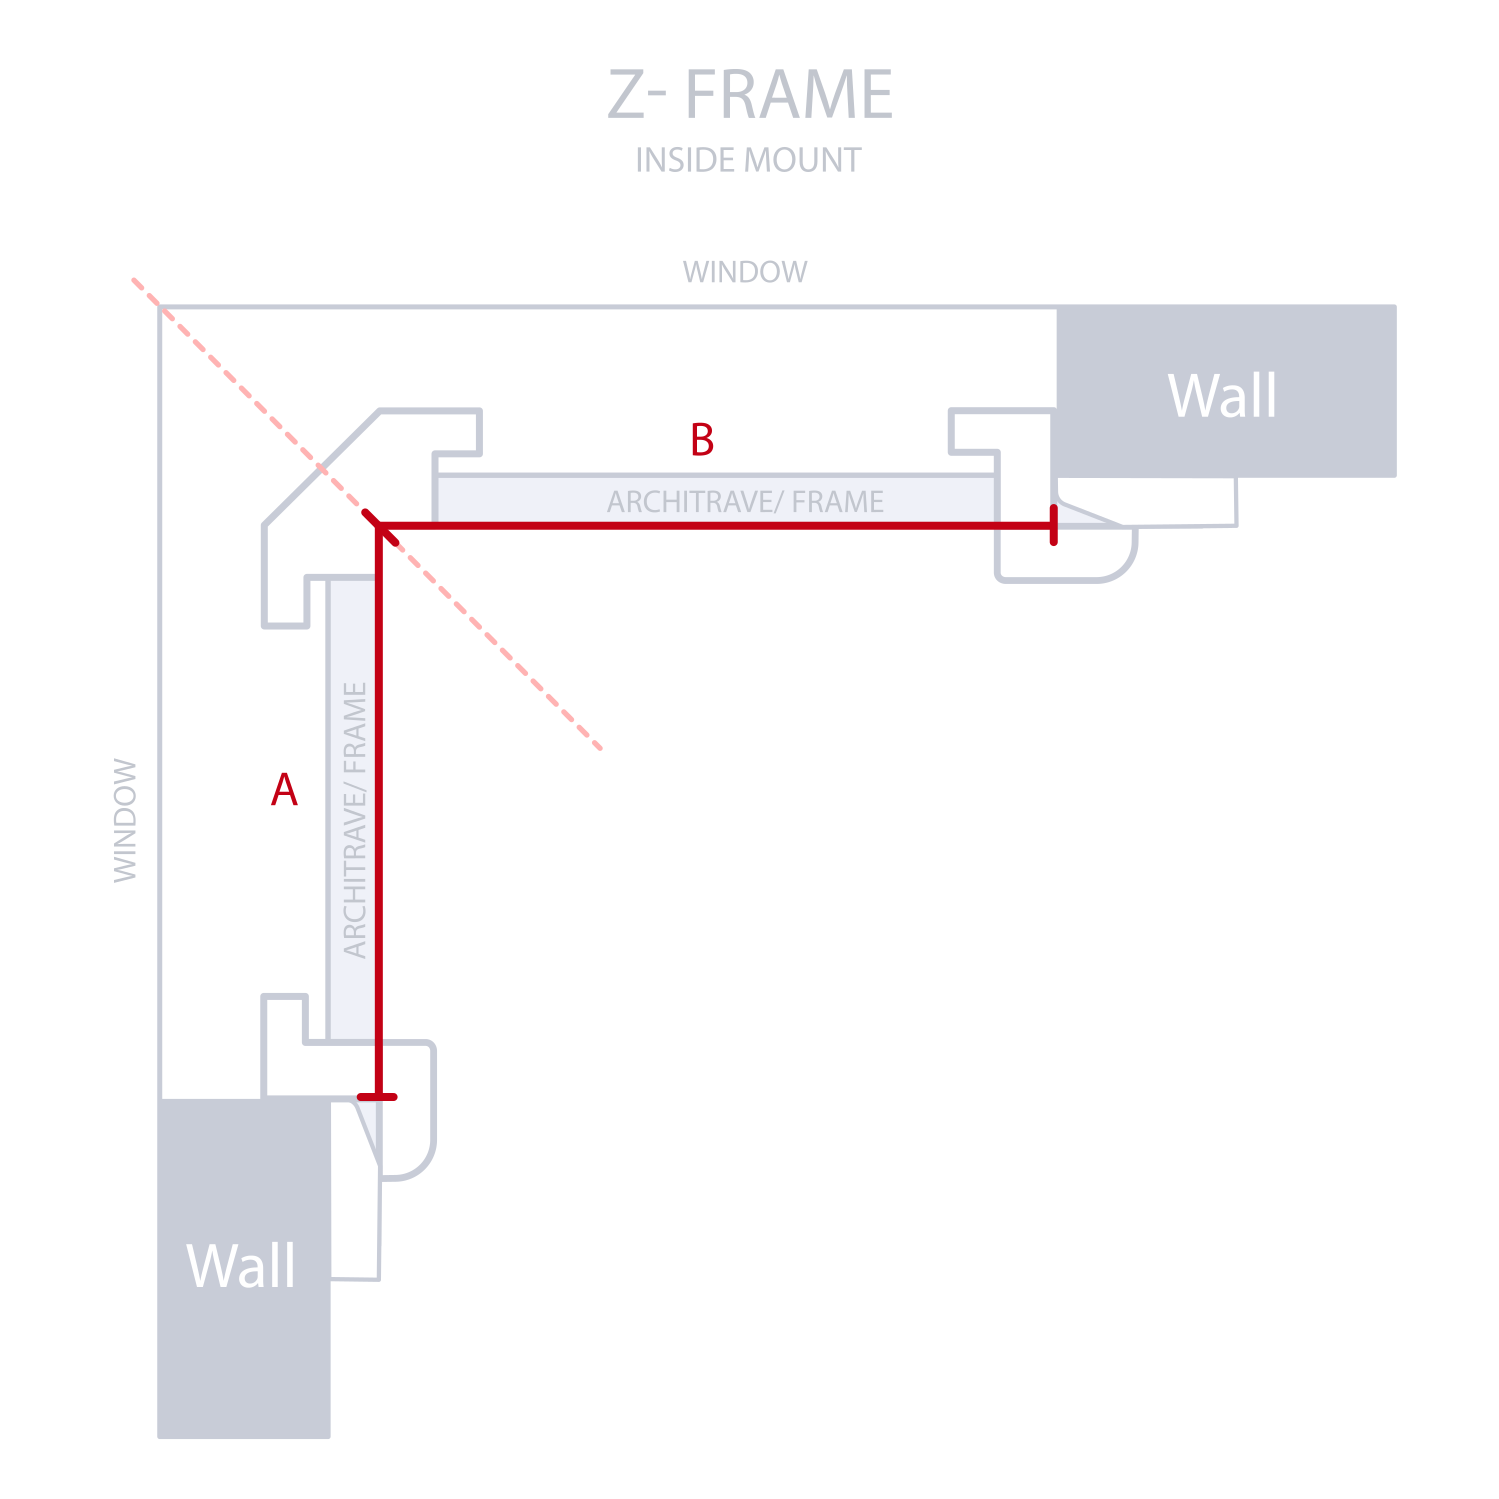
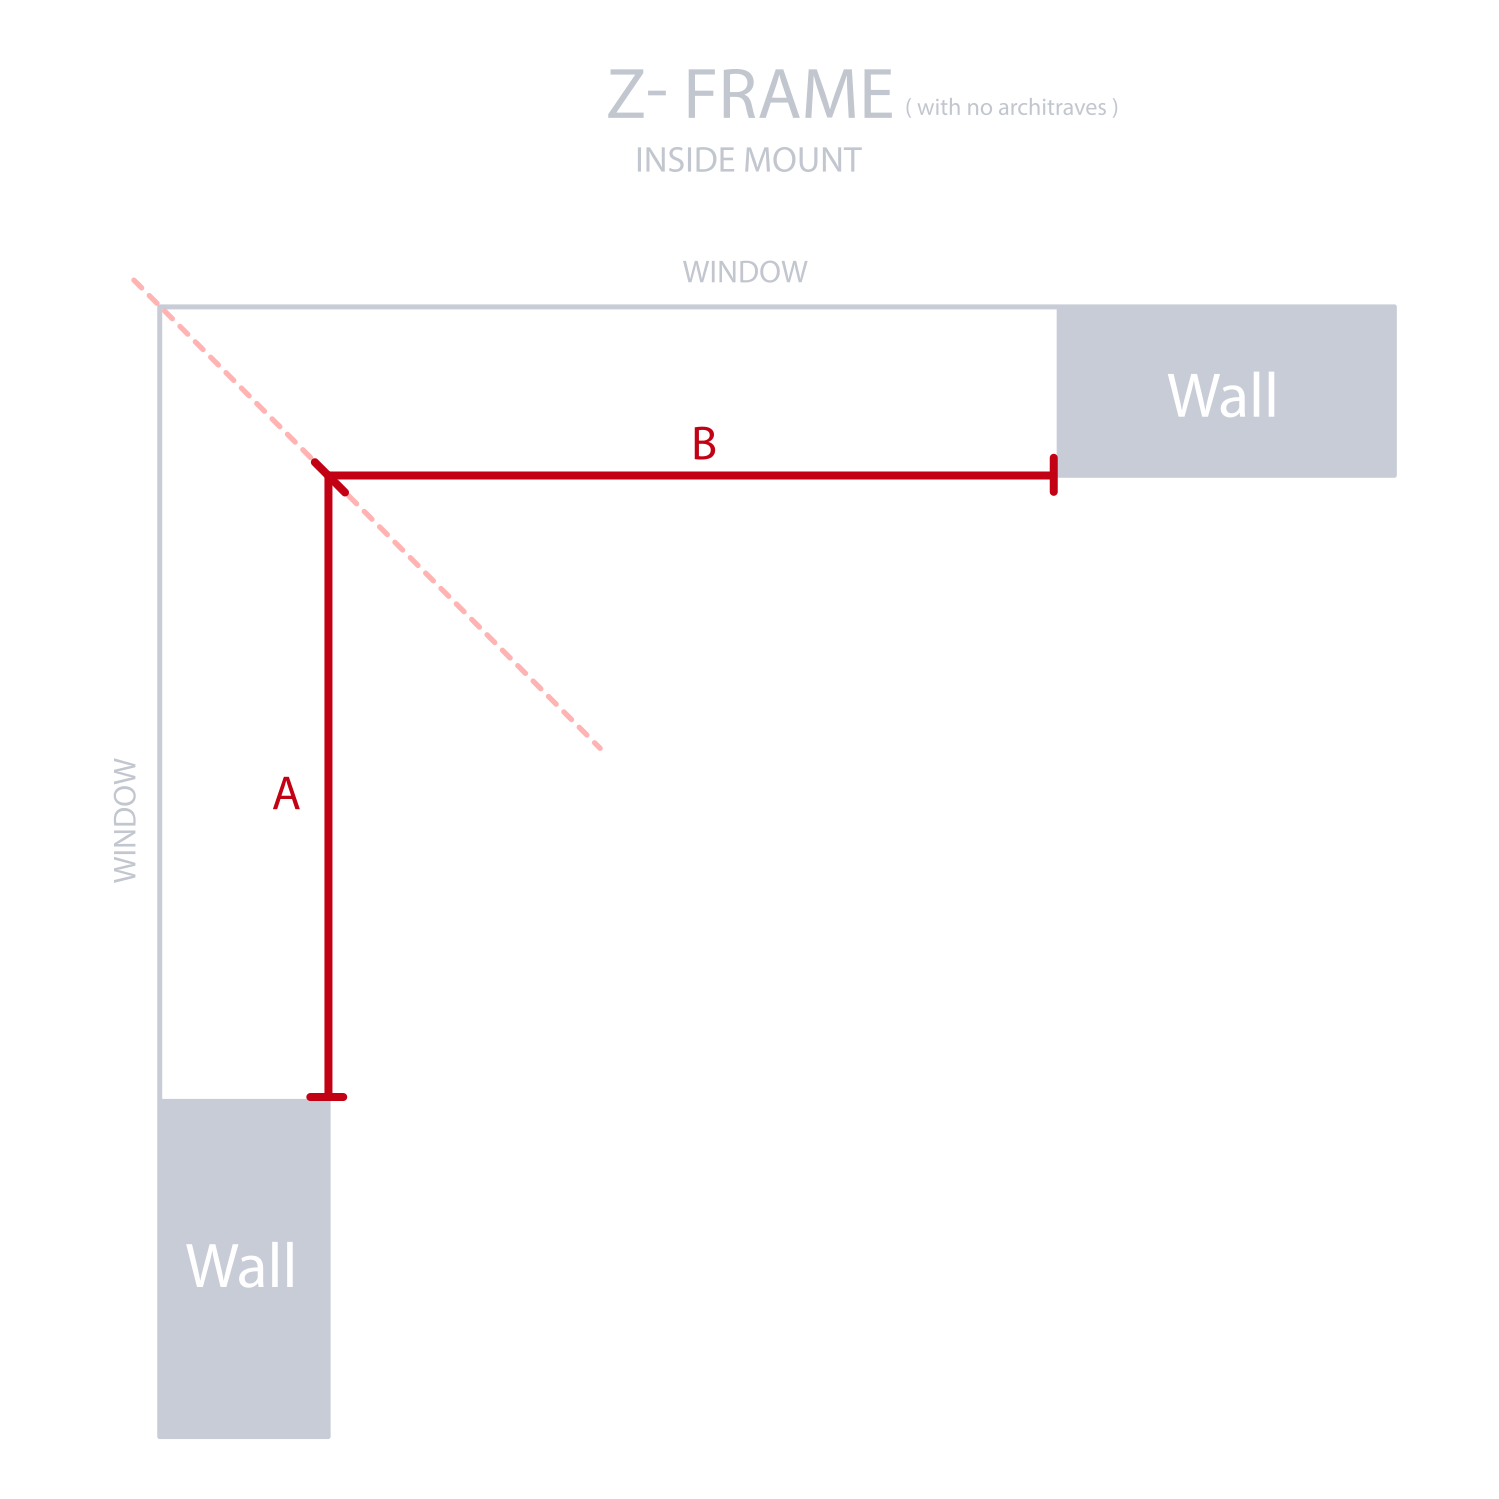
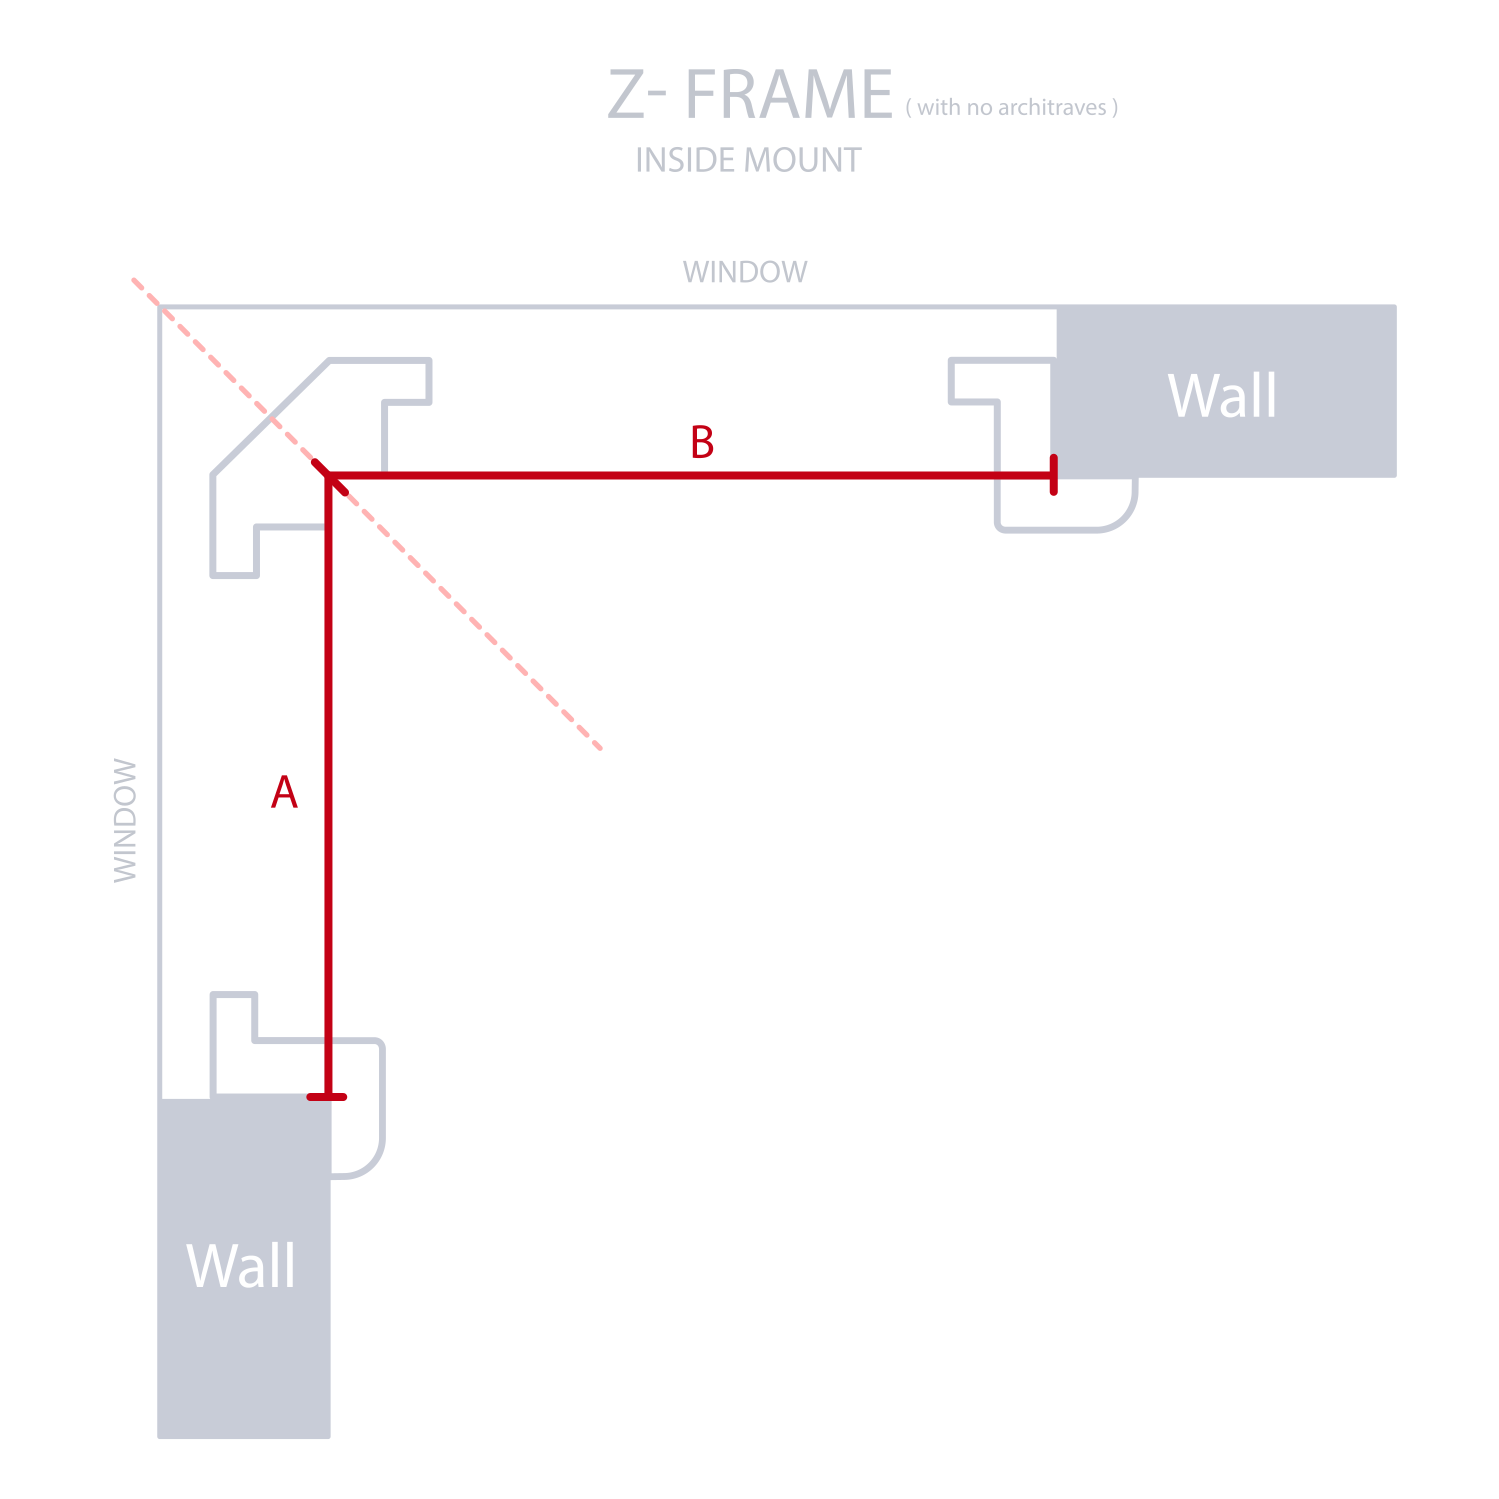
Measuring for an Inside Z-Frame
An Inside Z-frame wraps around the front edge of the recess, so the corner measuring points are determined by the actual Z-frame profile rather than simply using the recess intersection.
As a simple clearance rule for a Z-frame, aim for approximately 65mm of clear recess depth. If the depth is tighter or there are handles, winders or other obstructions, you may still be able to mount the shutter inside with less, check Managing Window Obstructions for more information.
1. Measure the width of the left window (A)
Important: Use the relevant diagram below depending on your window type.
- Begin at the inside edge of the left-hand recess. Take note of the architrave lip in illustrations below if your window has architraves.
- Measure across to the corner where the two recess faces meet. This will be along the edge of the face of the architrave.
- Take this width in two positions (Top and Bottom of your window) as windows can vary. Use the smallest of your measurements for each section.
- Mark that corner location as Measure Point A (Left).
2. Measure the width of the left window (B)
- Start at the right end of Measure Point L (A). where A+B meet in the middle section.
- Measure to the inside edge at the far end of the right-hand recess. Take note of the architrave lip in illustrations below if your window has architraves. This will be along the edge of the face of the architrave.
- Take this width in two positions (Top and Bottom of your window) as windows can vary. Use the smallest of your measurements for each section.
- Mark that corner location as Measure Point B (Right).
4. Measure the drop
- Measure bottom to top from inside the recess.
- Take the drop in three positions.
- Use the smallest of the three measurements.
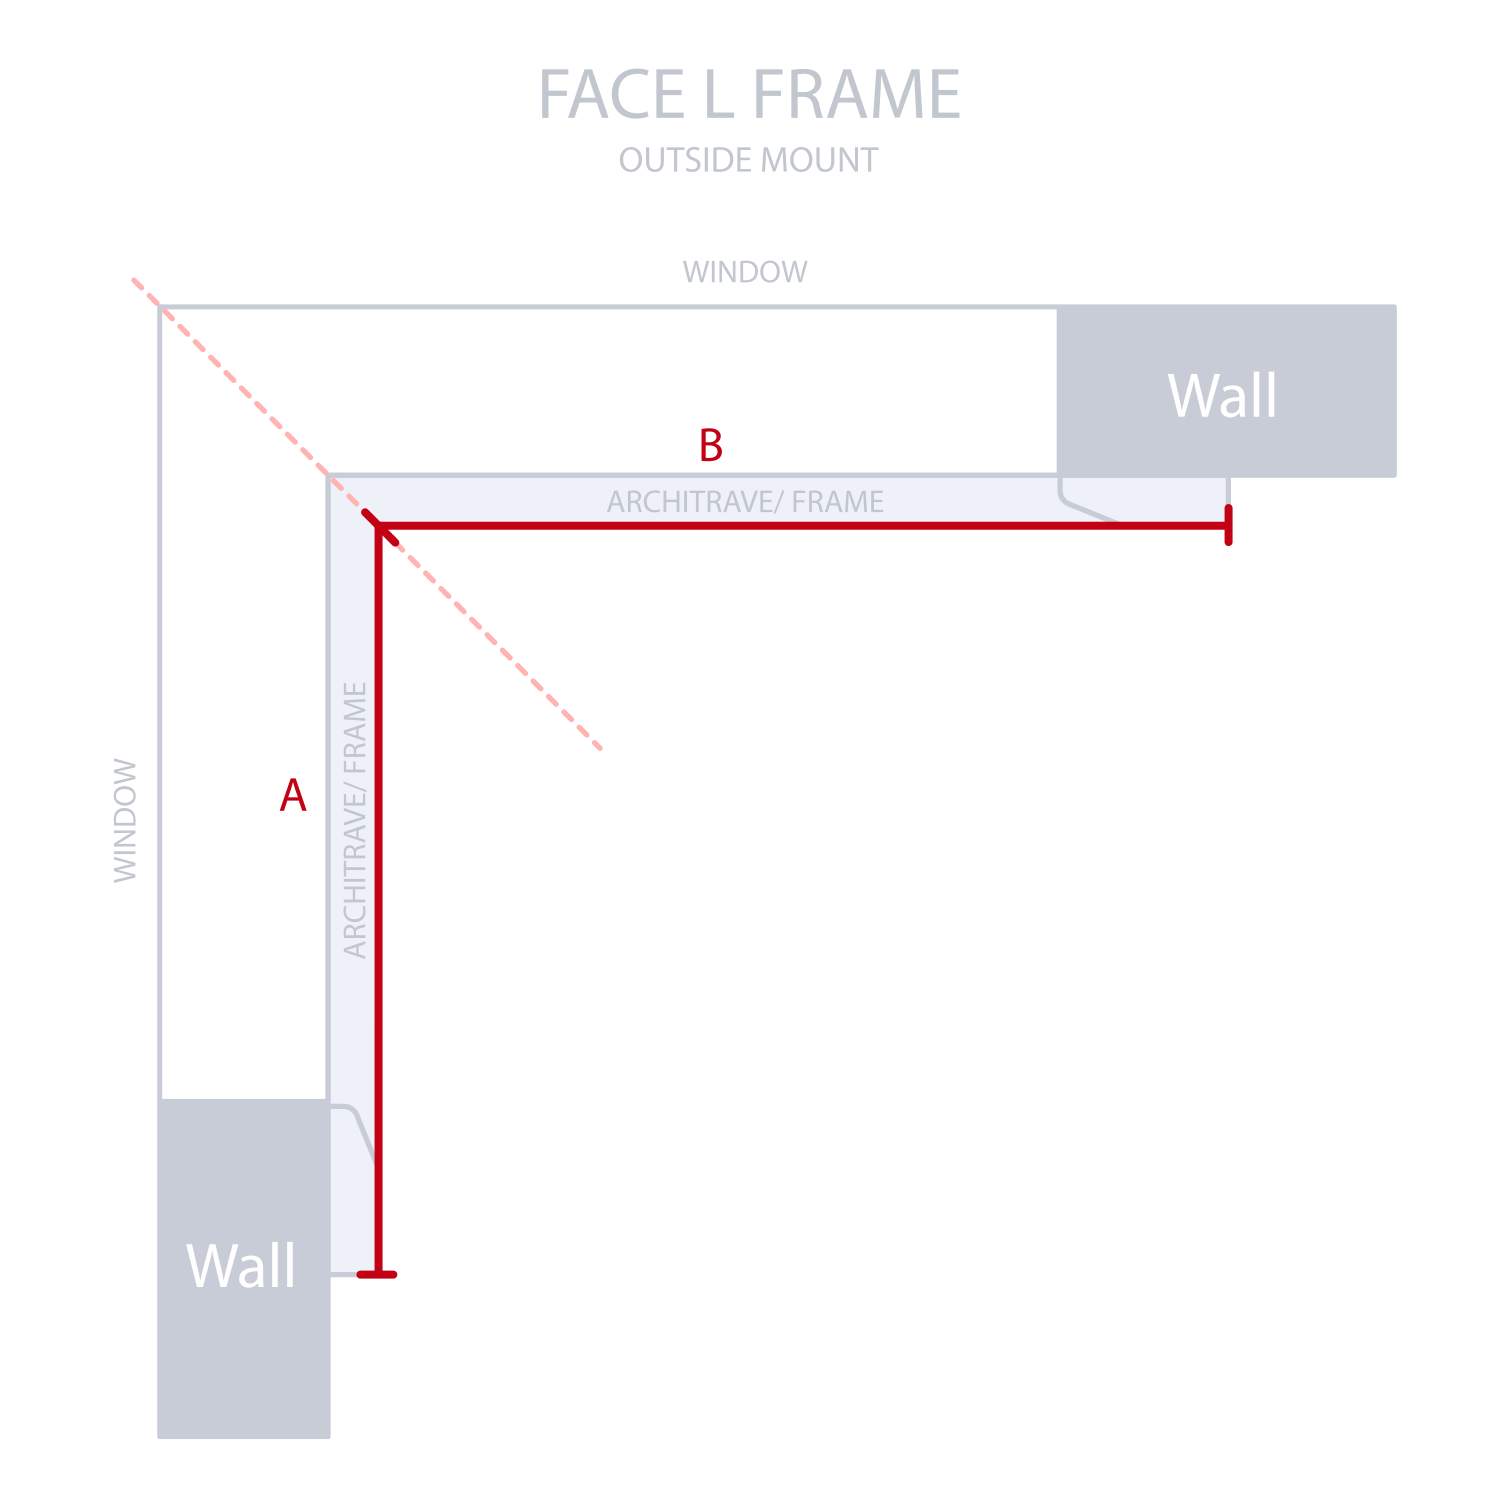
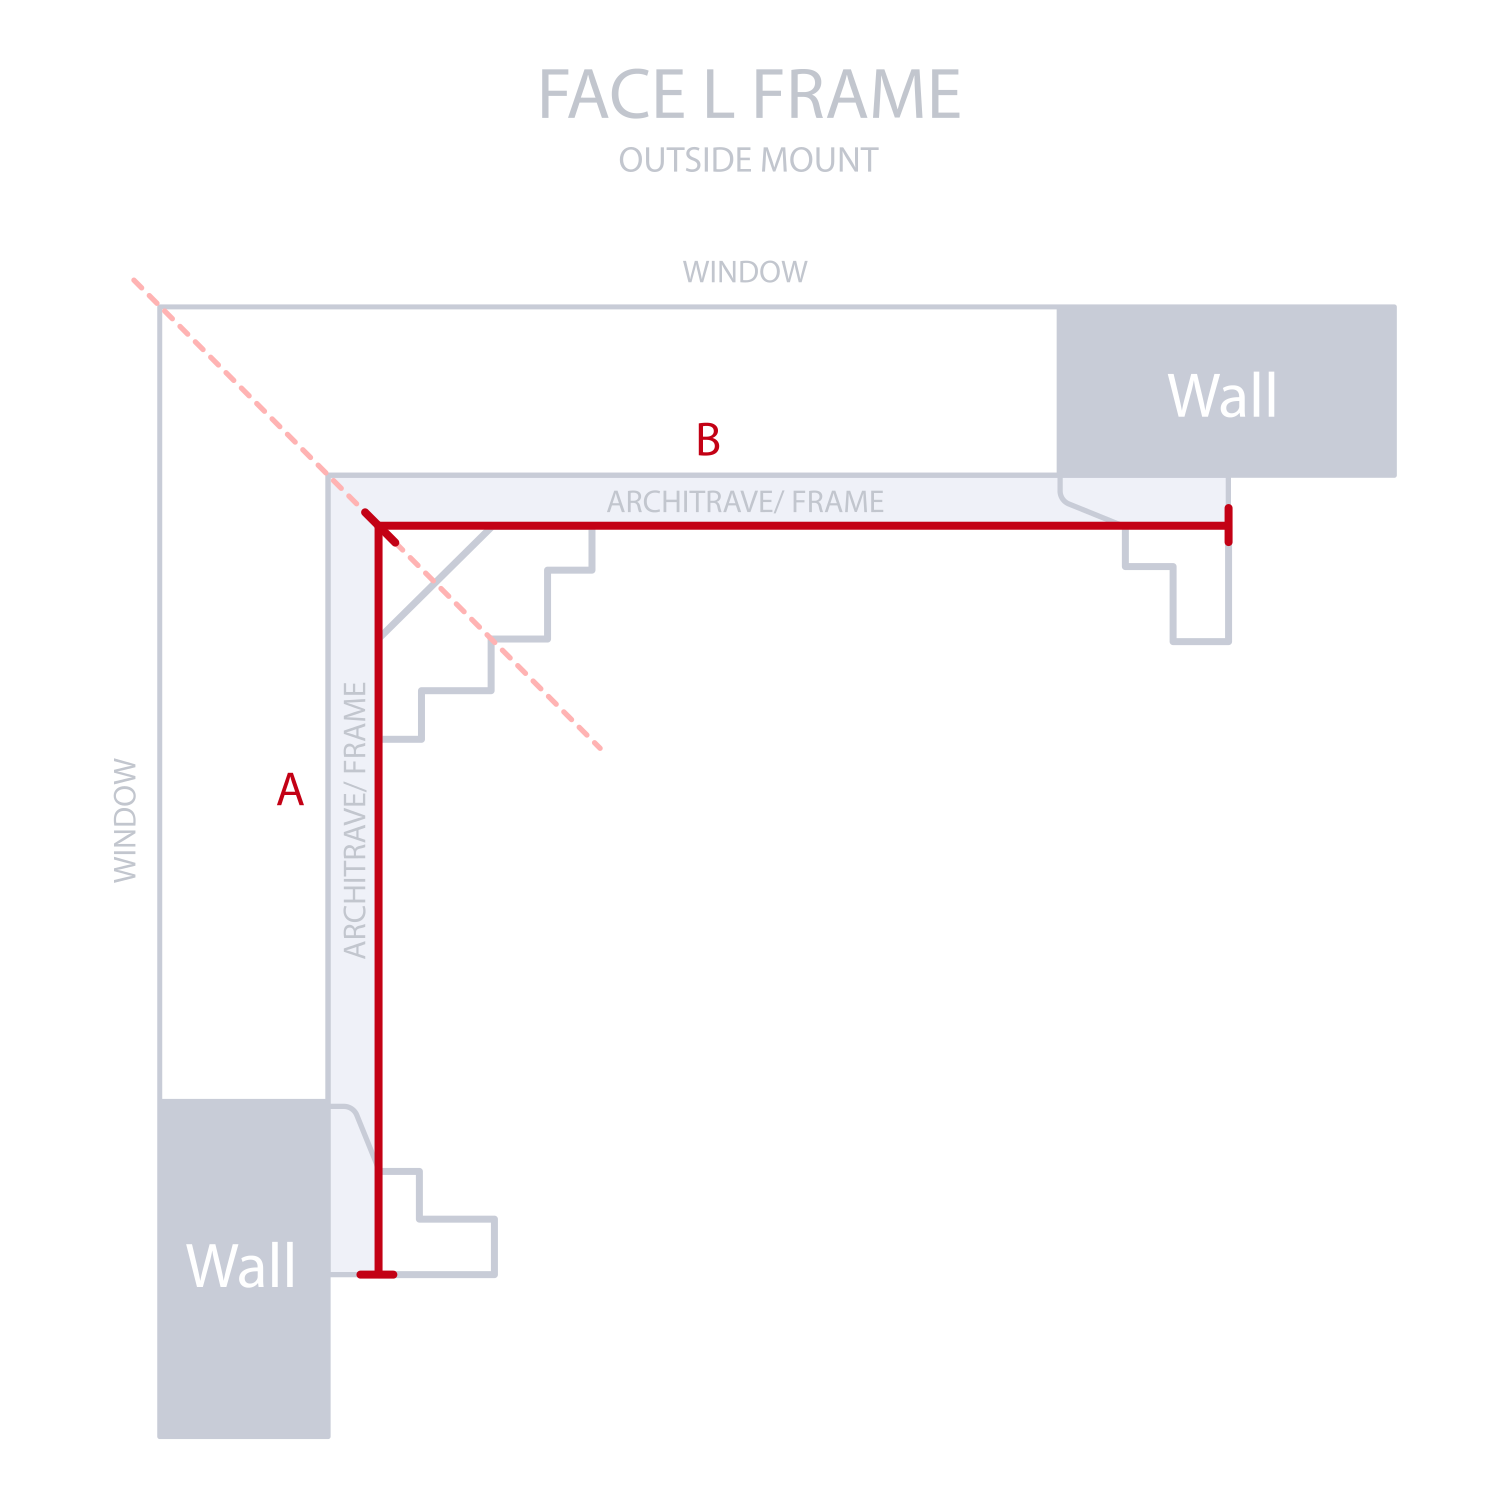
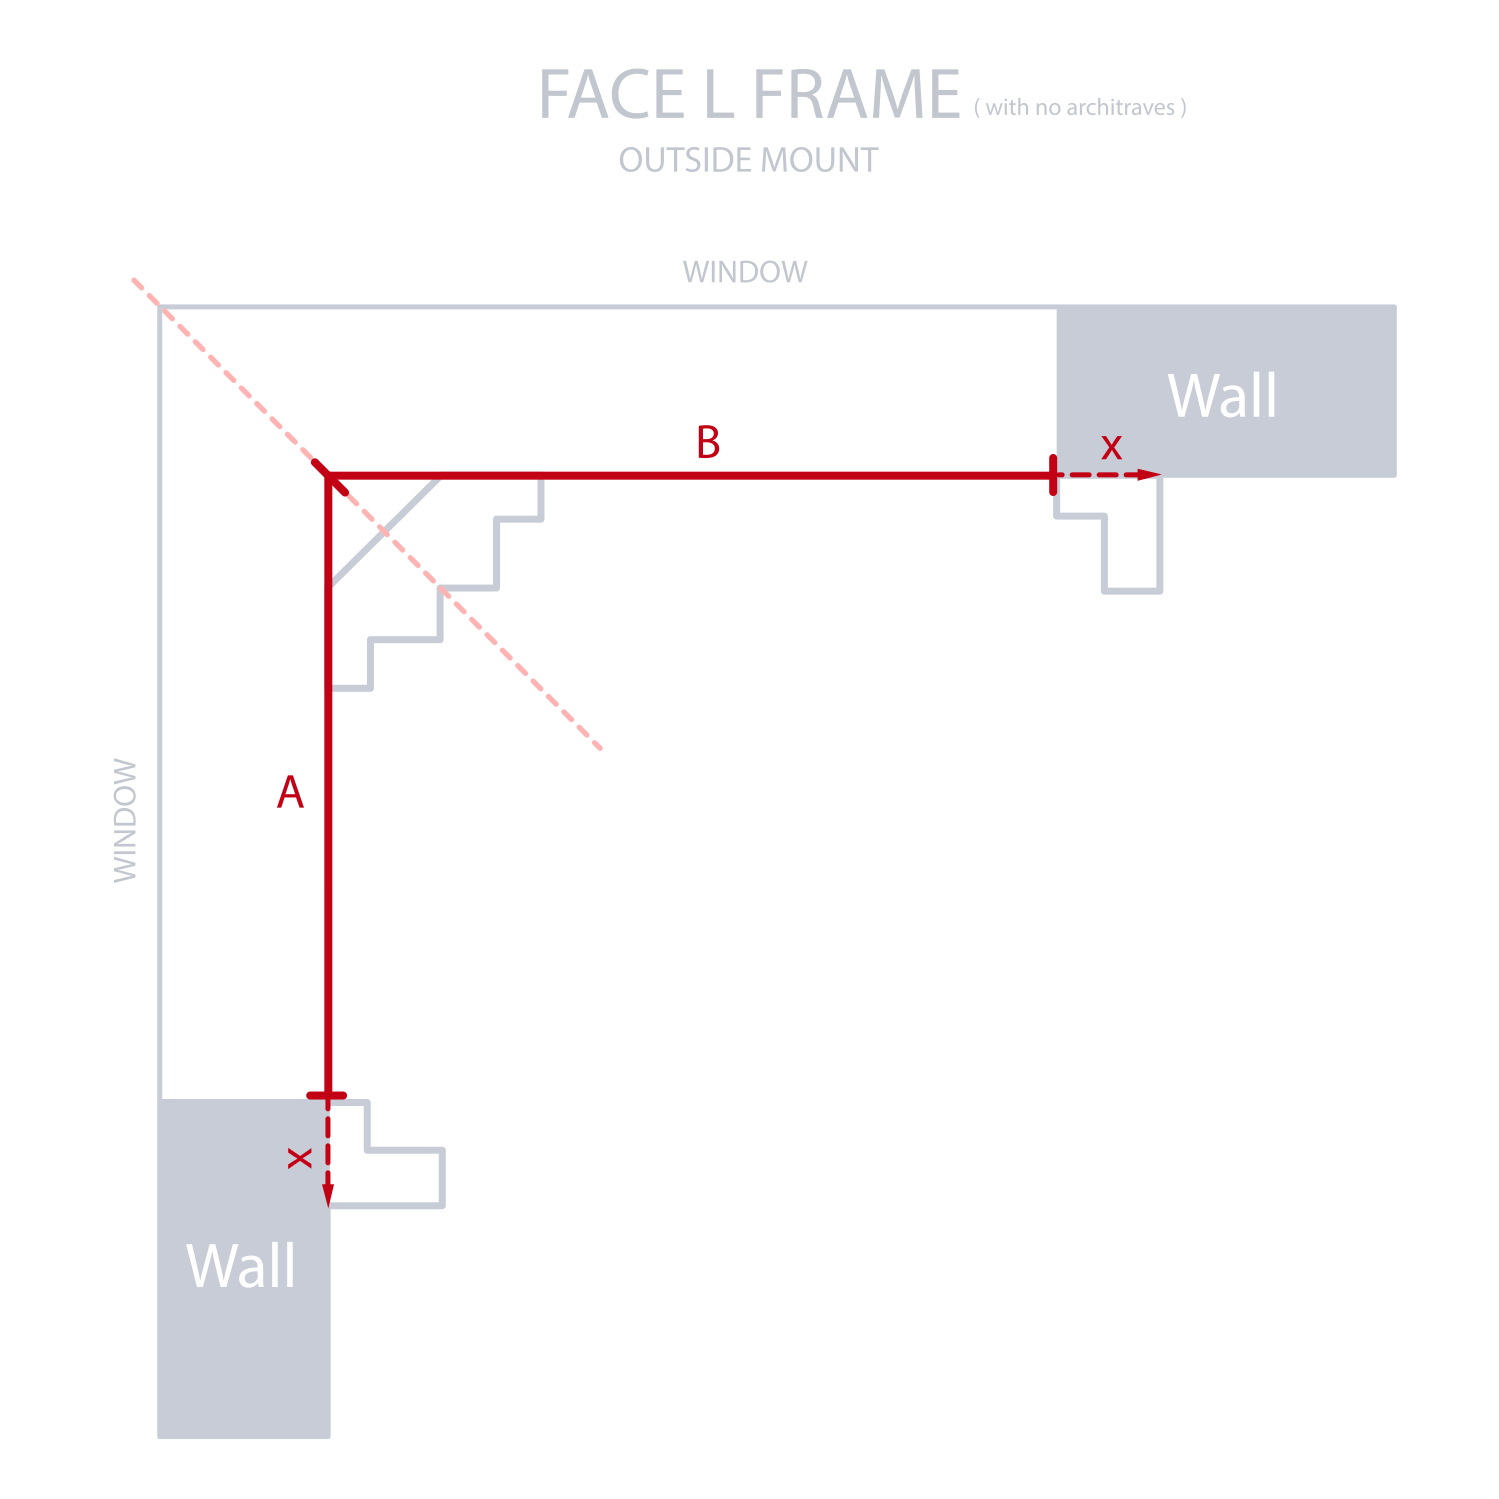
Measuring for an Outside L-Frame with an Architrave
For an Outside L-frame fitted to an architrave, use the outside edges of the architrave as your measuring references.
1. Measure the width of the left window (L)
- Start at the outside edge of the left-hand architrave.
- Measure to the corner where the two architraves meet. (A to B in above diagram)
- Take this width in two positions. (Top and Bottom widths). Use the largest of the two as we want the frame to fully cover the architrave at all points when fitted.
- Mark the corner as Measure Point L (A).
2. Measure the width of the right window (R)
- Begin at the right end of Measure Point L (B).
- Measure to the outside edge of the right-hand architrave. (B to C)
- Take this width in two positions. (Top and Bottom widths). Use the largest of the two as we want the frame to fully cover the architrave at all points when fitted.
- Mark the corner as Measure Point R (B).
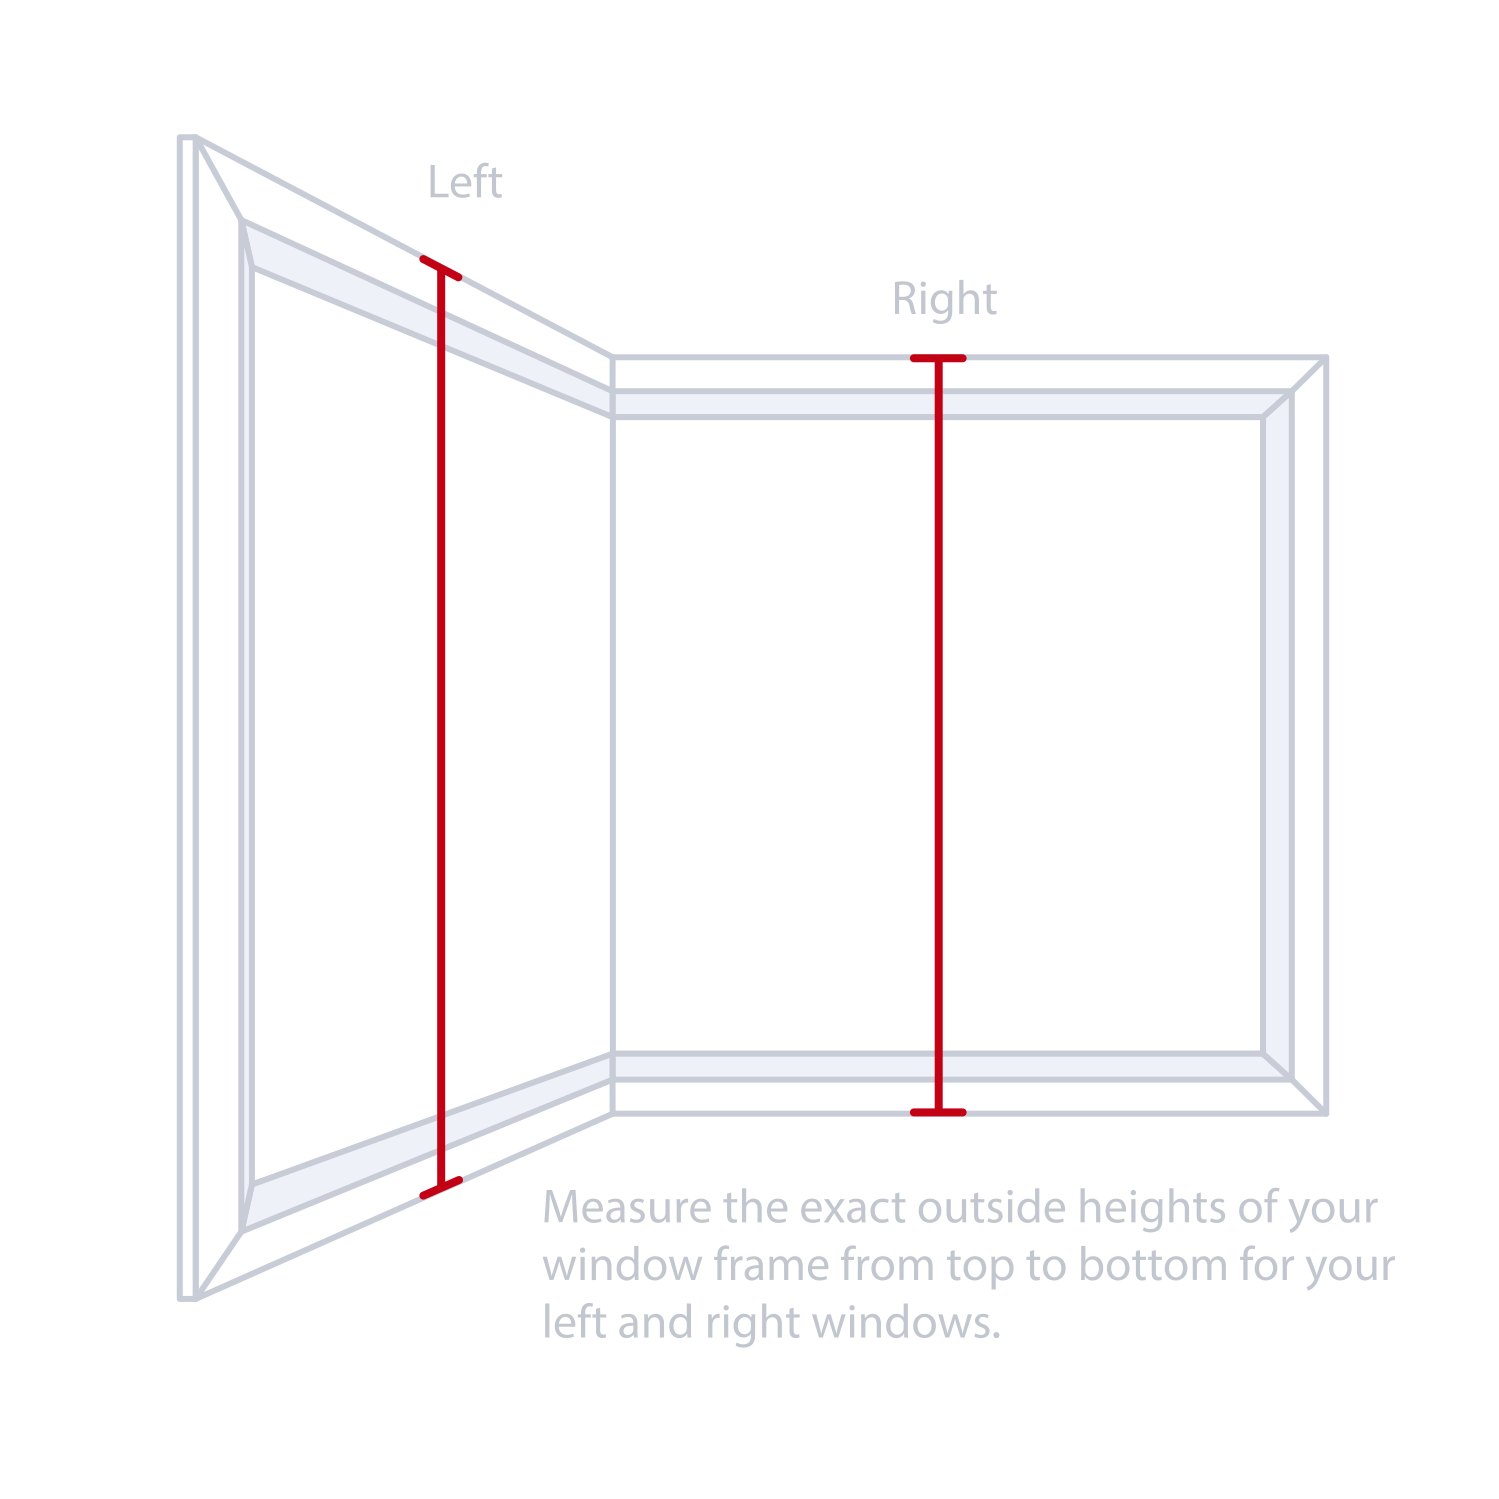
3. Measure the drop
Measure from the outside edge of the bottom architrave to the outside edge of the top architrave in three positions. Use the largest of your three measurements on each section.
4. Record the largest drop
For this outside-mount architrave method, record the largest of the three drop measurements. This is so we ensure the shutter will cover all parts of the architrave for aesthetic reasons.
5. Ordering
To order, enter your measurements for each separate window section that makes up the corner window (A + B) on the ordering page and tick the “Bay / Corner” window option. You will then have A and B as separate items in your cart, enter the same room name and which side the window is so we can match them.
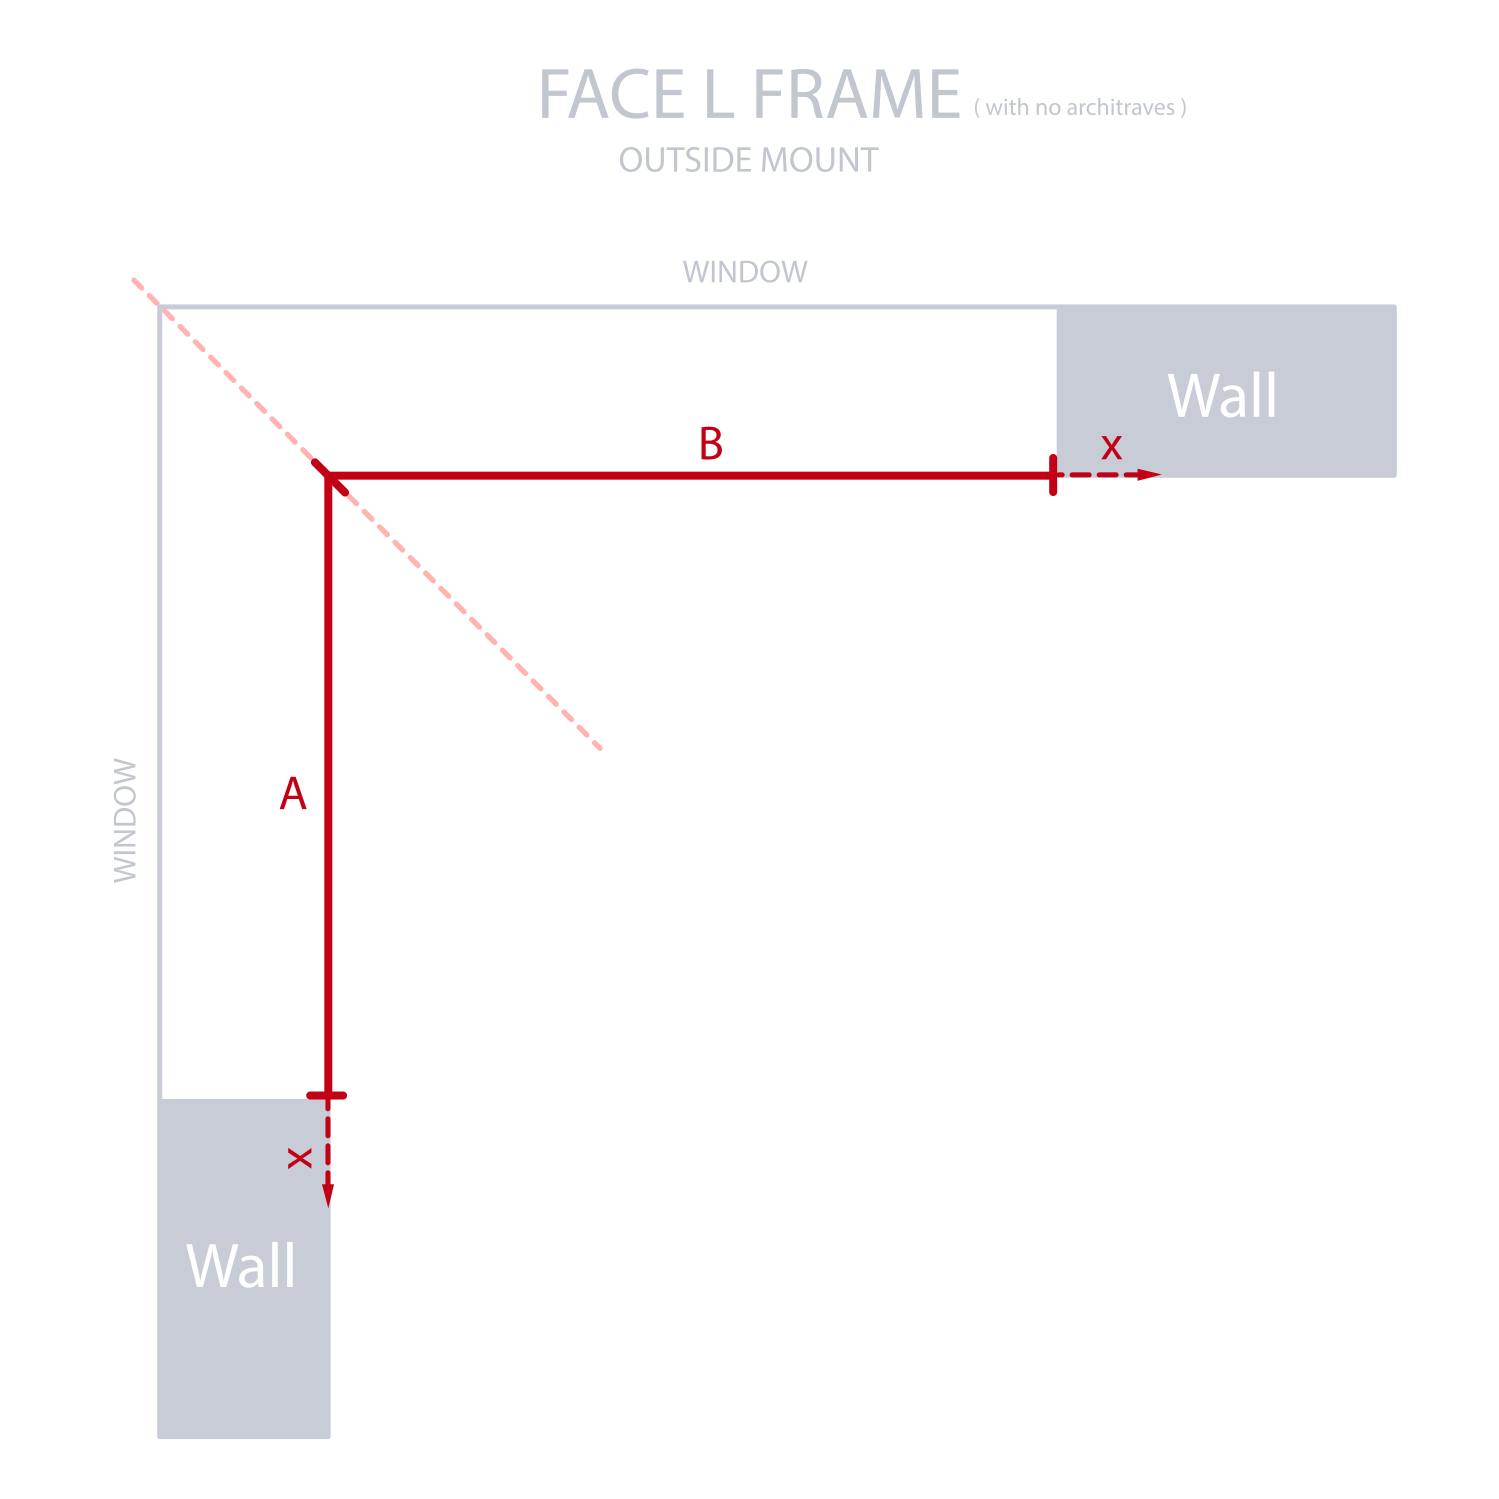
Measuring for an Outside L-Frame for a Square Set window
For an Outside L-frame fitted to a square-set window (no architraves), measure the window opening first, then add the required allowances to these measurements so the frame sits neatly around the outside of the opening. More details are provided below.
1. Measure the width of the left window (A)
- Start at the outside edge of the window opening.
- Measure to the corner where the two windows meet. (A to B in above diagram)
- Take this width in two positions. (Top and Bottom widths). Use the largest of the two as we want the frame to fully cover the architrave at all points when fitted.
- Add 42mm (X) to your width measurements for this section. This is so the frame will sit outside the opening.
- Mark the corner as Measure Point L (A). Recap: Measure ((A to B) + 42mm)
2. Measure the width of the right window (B)
- Start at the outside edge of the window opening.
- Measure to the corner where the two windows meet. (B to C in above diagram)
- Take this width in two positions. (Top and Bottom widths). Use the largest of the two as we want the frame to fully cover the architrave at all points when fitted.
- Add 42mm (X) to your width measurements for this section. This is so the frame will sit outside the opening.
- Mark the corner as Measure Point R (B). Recap: Measure ((B to C) + 42mm)
3. Measure the drop
Measure the window opening in three positions.
4. Record the largest drop and add allowance for the frame
Use the largest of your three measurements on each section on the step above. Then add 84mm to this measurement.
4. Record the largest drop and add allowance for the frame
Use the largest of your three measurements on each section on the step above. Then add 84mm to this measurement.
Multiple Panels
Shutter Panels
Plantation shutters are divided into individual panels. For windows wider than around 950mm, more than one panel will generally be required. Individual panels can be made up to approximately 900mm wide, with the surrounding frame adding a little extra overall width.
Where possible, plan the shutter panel layout so it follows the vertical divisions of the existing window.
What if the window panes are uneven?
If the existing panes are not evenly divided, custom panel widths can be achieved by placing the T-posts in custom locations to align more naturally with the window layout.
Multiple Panels for Corner Windows
The corner post extends slightly into both window faces. This affects the panels closest to the corner and needs to be considered when you want panel joins to line up with window mullions.
- Equal-width panels: a simple option where each side only needs a small number of panels and exact mullion alignment is not important.
- Custom-width panels: use this when you want T-posts or panel joins to line up with unequal vertical window divisions. The panel nearest the corner will often end up narrower than the others.
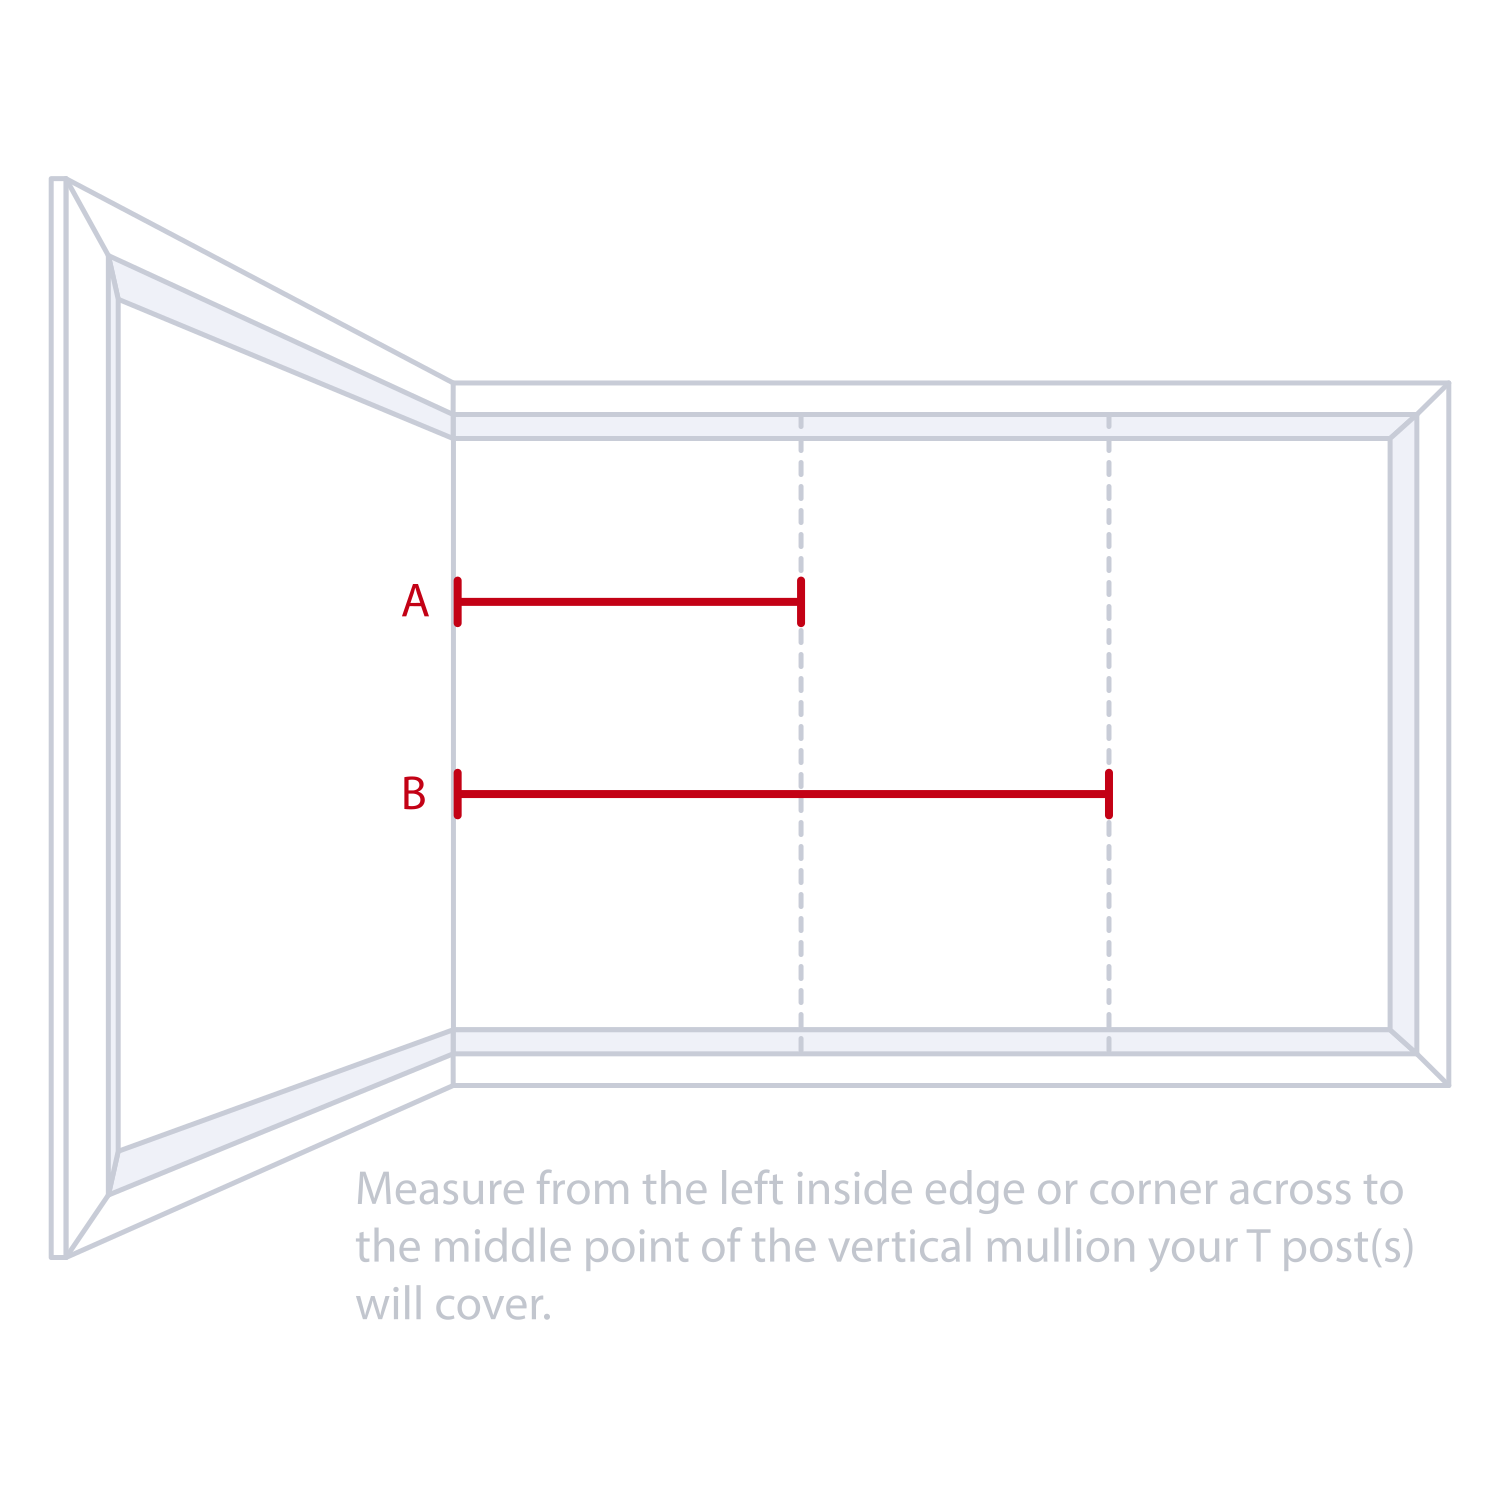
Measuring Custom T-Post locations
Always begin your measurement from the left hand side.
For the left section of your corner window:
- For an inside mount, begin at the inside edge of the recess.
- For an outside mount with an architrave, begin at the outside edge of the architrave.
- For a square-set outside mount, follow the square-set outside-mount reference point. (Opening section +42mm).
- Measure from that same starting point to each vertical break where a T-post should sit.
For the right section of your corner window:
Begin your measurement in the inner corner and stop to the centre point of each vertical break where a T-post should sit.
Was this article helpful?
Related articles
Still need a hand?
Send us your window measurements and photos if you are unsure about the right shutter setup.